
Kubernetes Development and Testing
In this section, we will show how Crafting helps development and testing for apps and services running on Kubernetes. The key challenges for developers working with Kubernetes services are:
- It is difficult for a developer to emulate a Kubernetes environment on their local dev environment for the service to run on.
- There is often no on-demand per-developer Kubernetes environment available for developers to use as context for develop their component.
- There is a long iteration cycle involved to test a service in a proper Kubernetes environment, which typically involves coding locally, build container, upload container, relaunch Kubernetes.
The main benefits of using Crafting for Kubernetes include:
- Develop in a production-like Kubernetes environment and iterate quickly
- Use the same Kubernetes config files from production/staging
- Per-developer self-contained Kubernetes environments running product end-to-end
- Interactively code and see results immediately without re-launching containers
- Launched on-demand with one-click and auto-suspended when not used
The rest of this section has following topics:
- Create a per-developer namespace to run services on Kubernetes
- Interactive debug in Kubernetes context via traffic interception
- Manage lifecycle of Kubernetes namespaces with sandbox
- Setup Checklist
A video demo can be found here
Create a per-developer namespace to run services on Kubernetes
With Crafting, you can create your own self-contained namespaces on Kubernetes to run services for development and testing. You can have the whole end-to-end context with all the services running and have the service you are working on running alongside with them for high-fidelity testing.
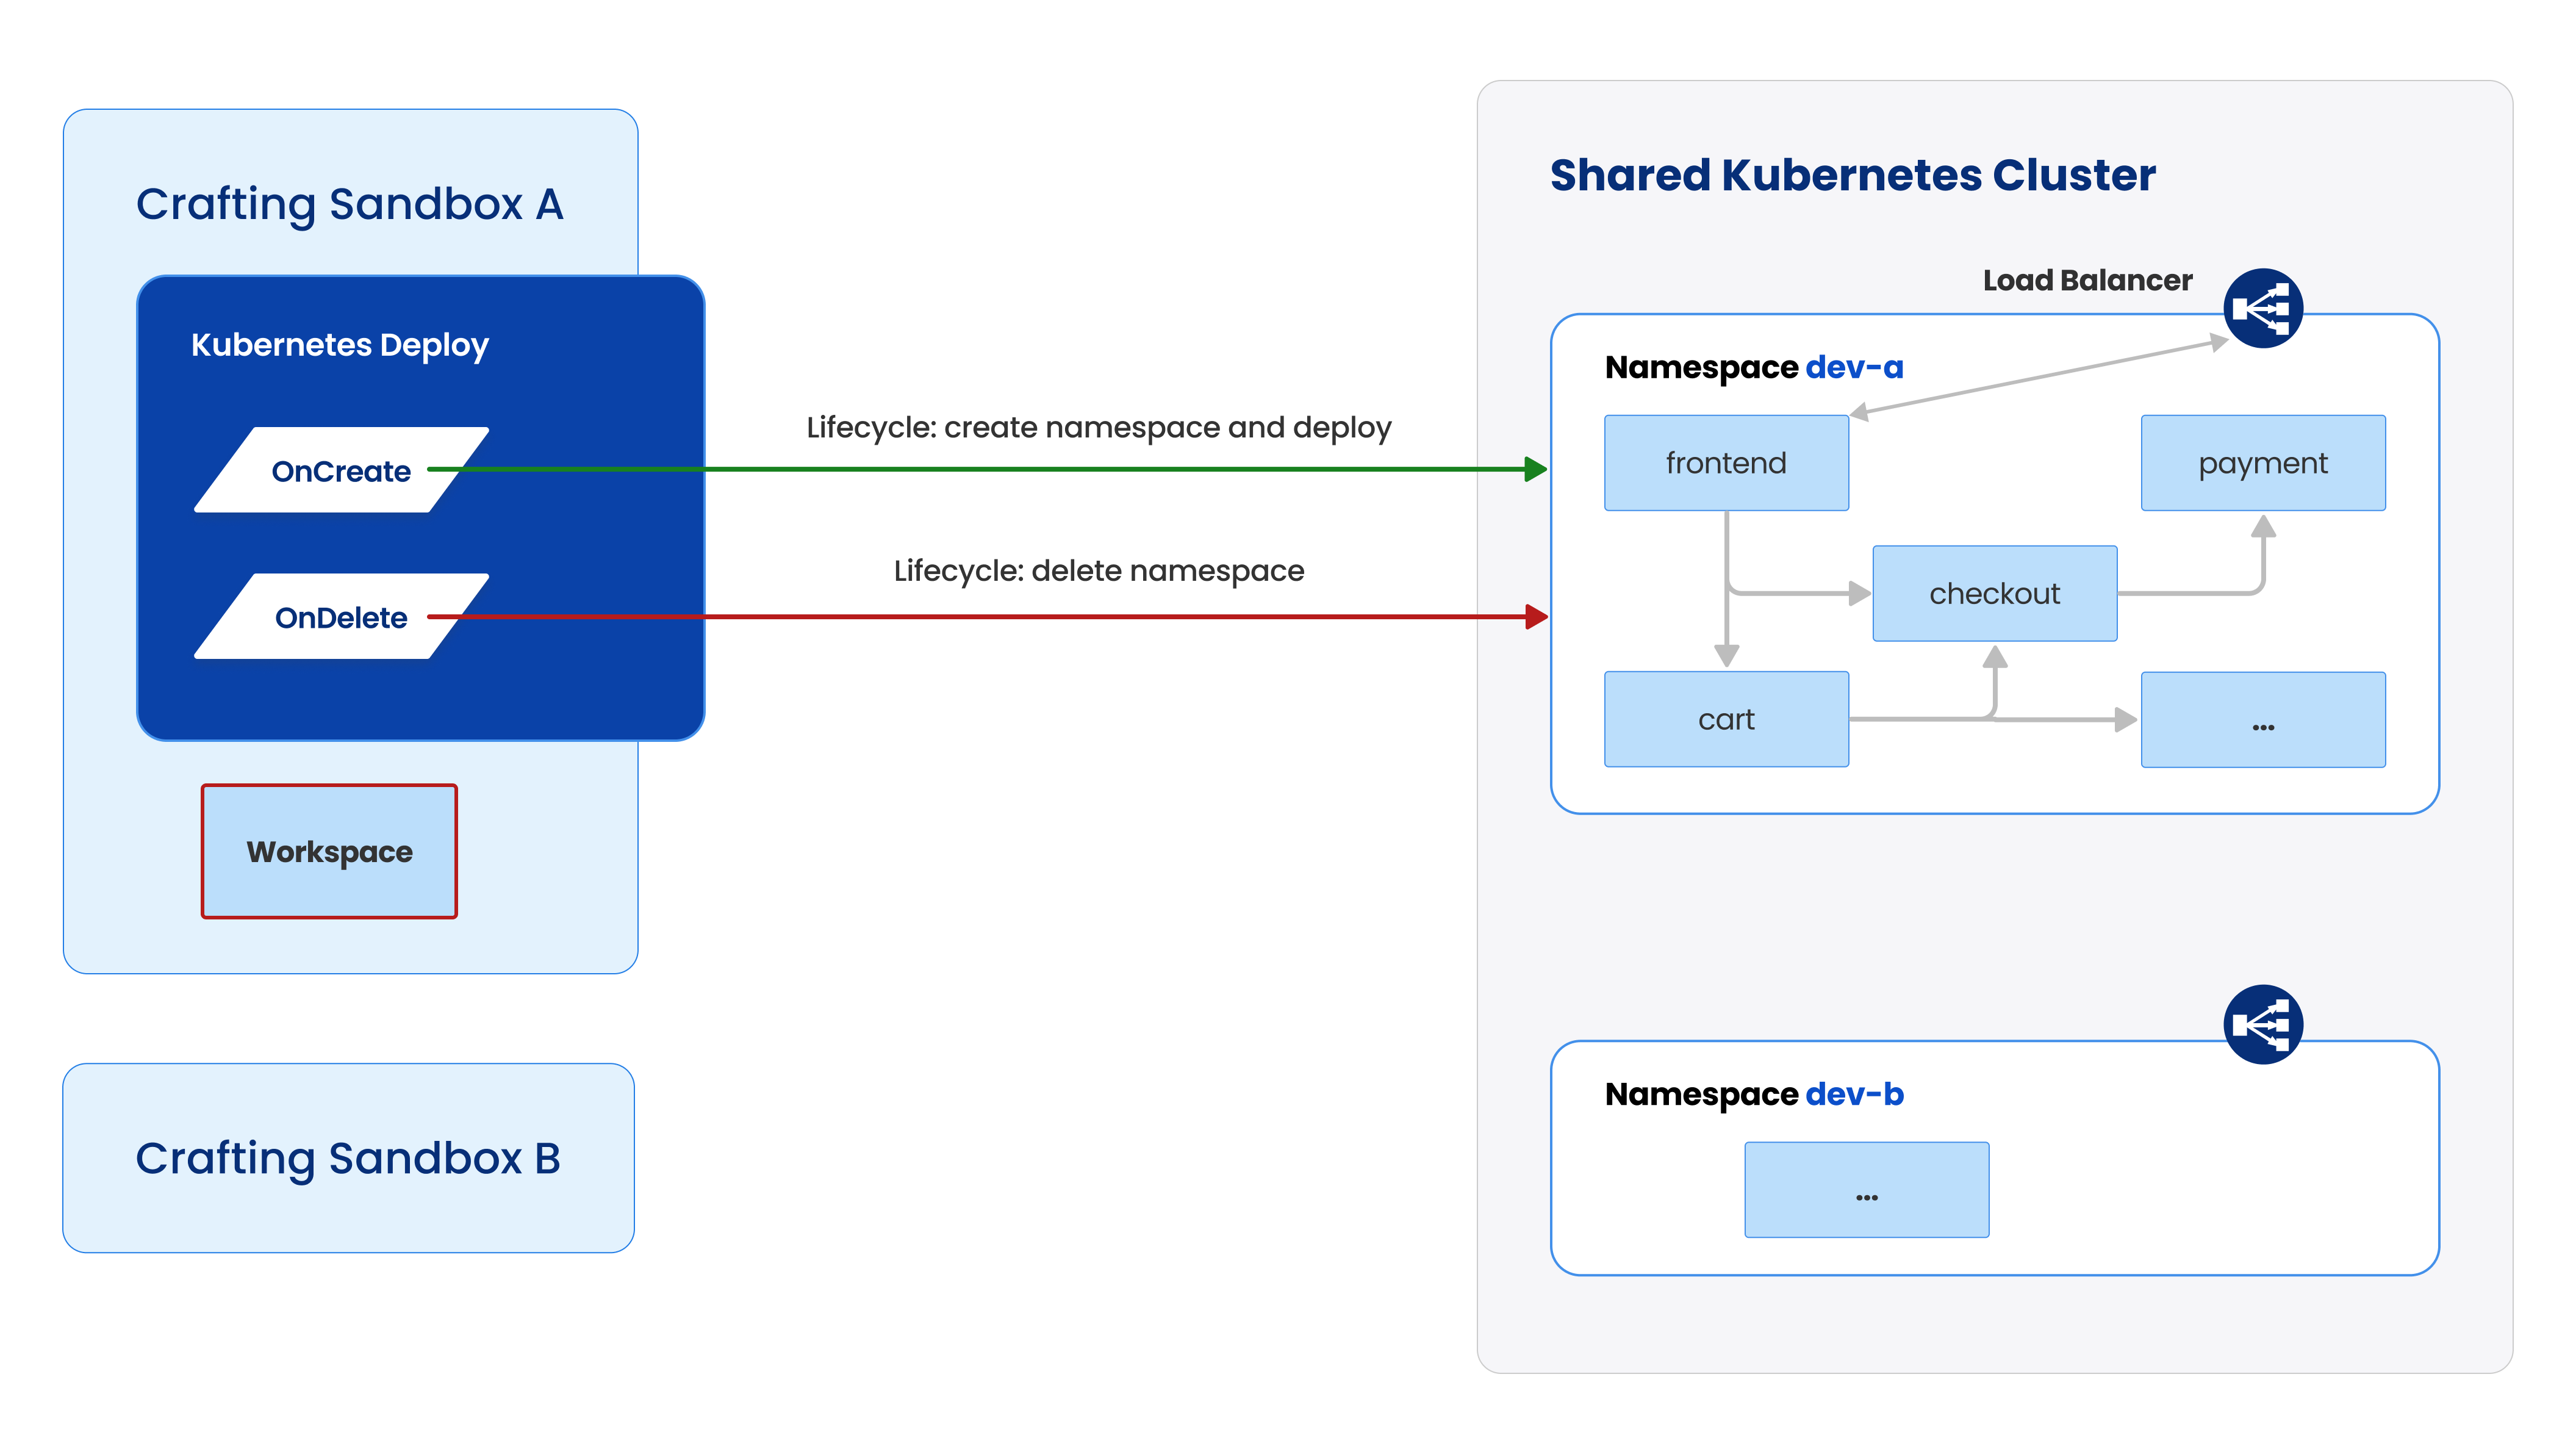
As shown in the diagram above, you can use your Crafting Sandbox to launch a per-sandbox Kubernetes namespace on-demand, automatically with pre-set configurations. The newly launched namespace is "bound" with the sandbox and multiple sandboxes could have their corresponding namespaces launched and running at the same time, helping you and your teammate develop in parallel.
You can reuse your production or staging Kubernetes config such as Kubernetes manifests or helm charts with little modification in order to launch services that has high production fidelity. The Kubernetes cluster for running your namespaces can be a new cluster or the staging cluster you already have configured properly, with access to all the cloud resources you already use.
Now let's walk through the process step by step.
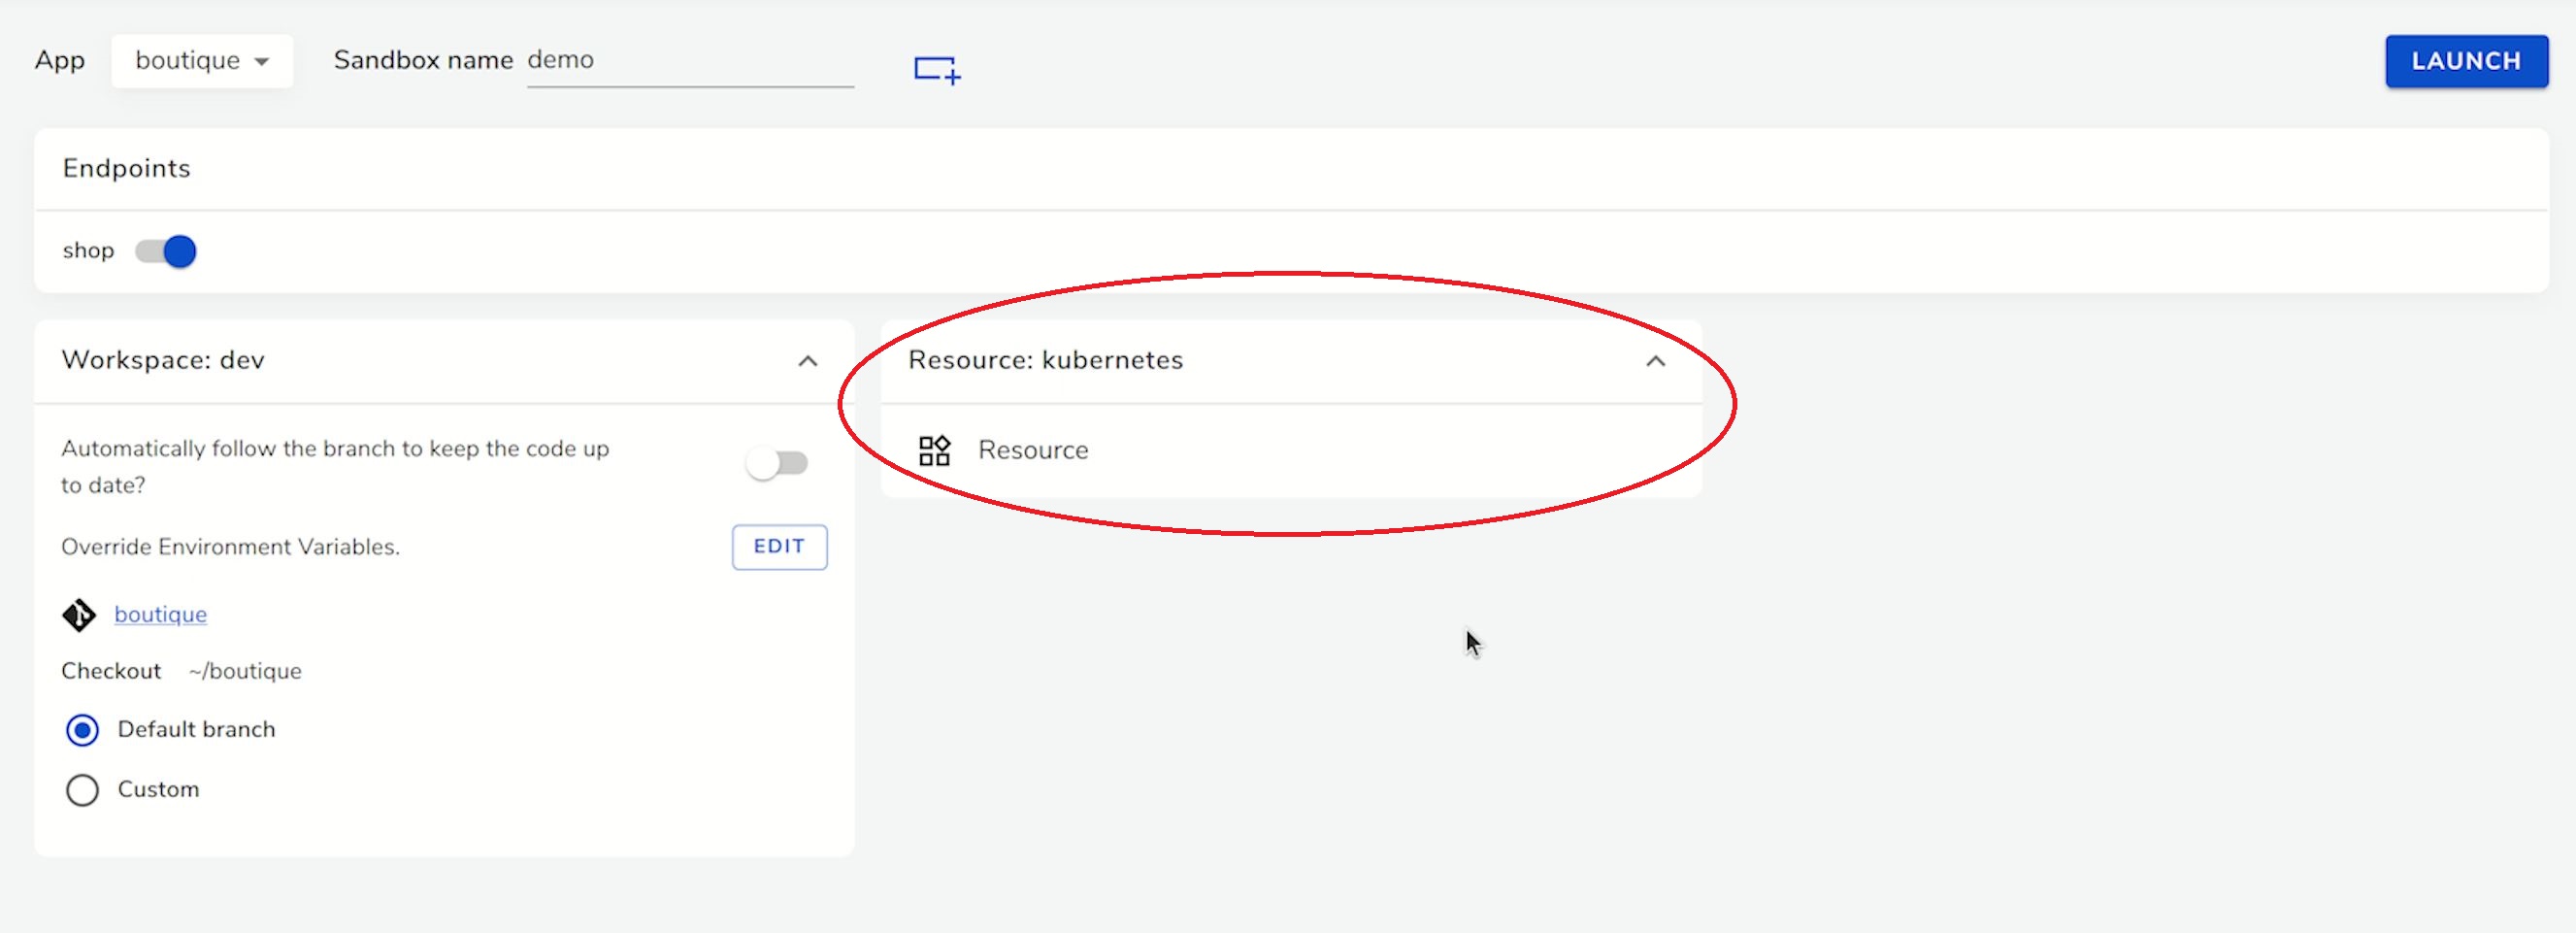
From the sandbox, we can see that the deployment in the per-sandbox Kubernetes namespace is represented as a resource in the sandbox. Remember we earlier mentioned that on Crafting platform a resource represents an external entity that are managed together with the workspaces in a sandbox. You can customize the resource to create the namespaces and launch services in it. That way, individual developers don't need to learn how Kubernetes works, everything is configured properly to offer a one-click experience. In this example, we are using the example Kubernetes app from Google Cloud Platform, whose git repo can be found here. Now, you can create the sandbox with the development workspace and Kubernetes resource by clicking LAUNCH.
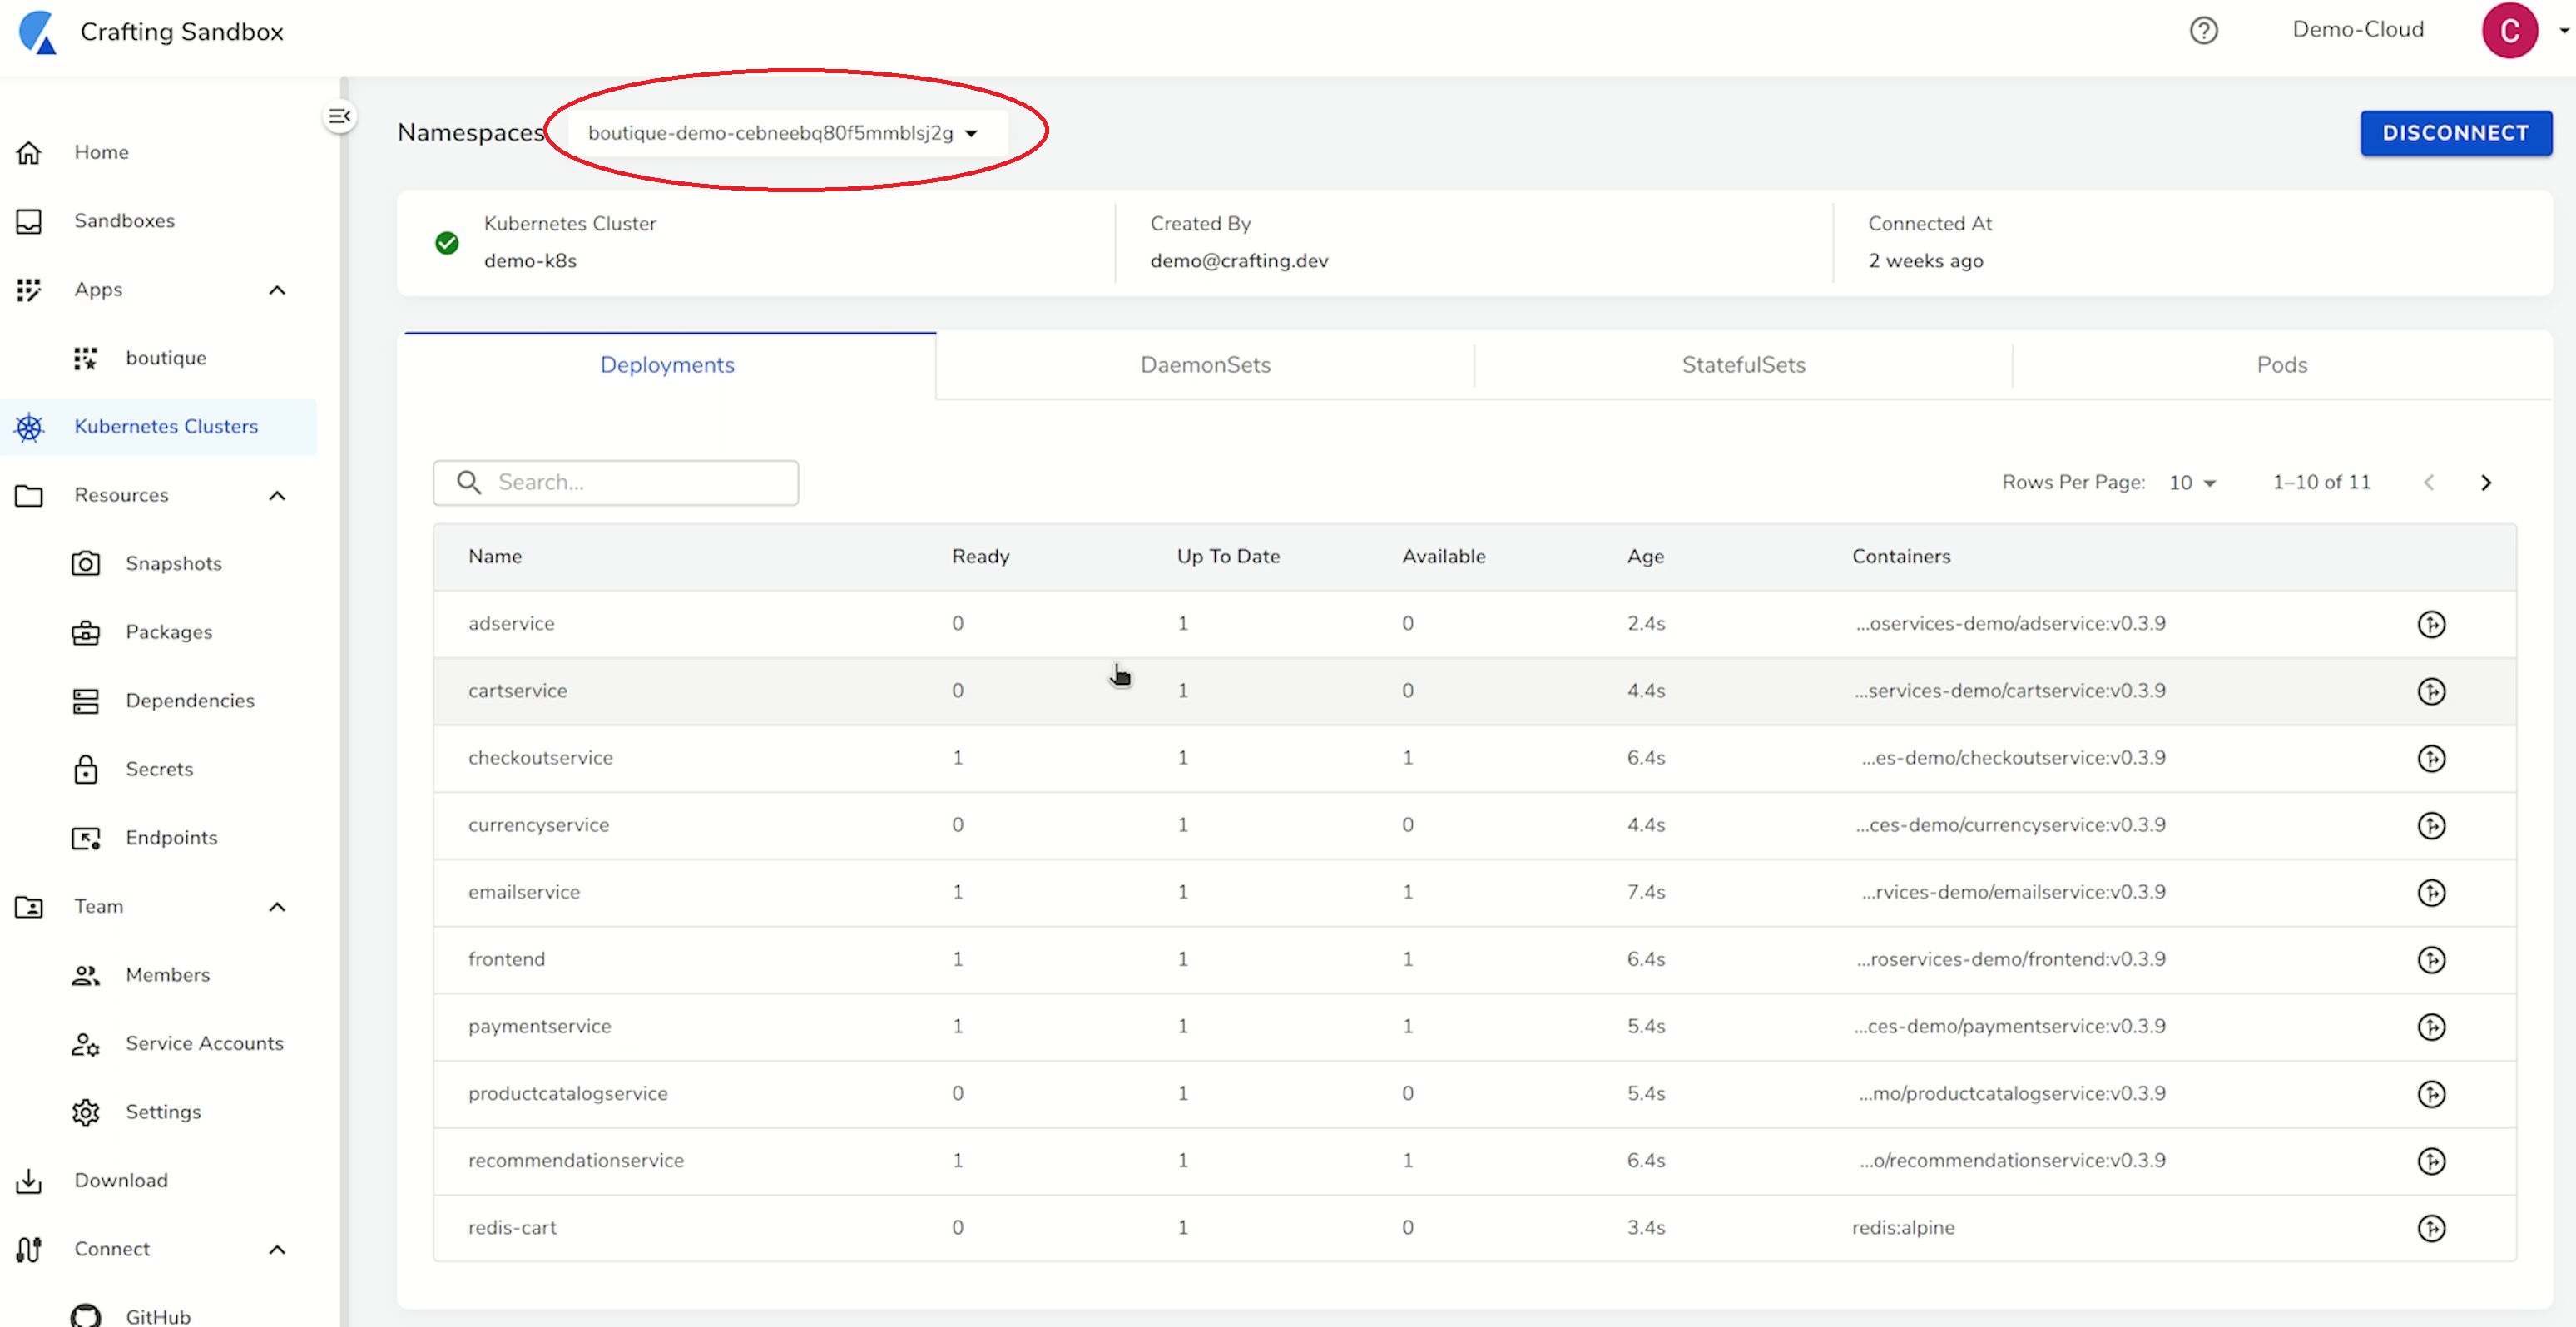
After launching sandbox, as the development workspace is prepared, a namespace in the connected Kubernetes cluster is also created with all the services launched. It is controlled by the scripts in the resource, which you can customize to do any additional setup.
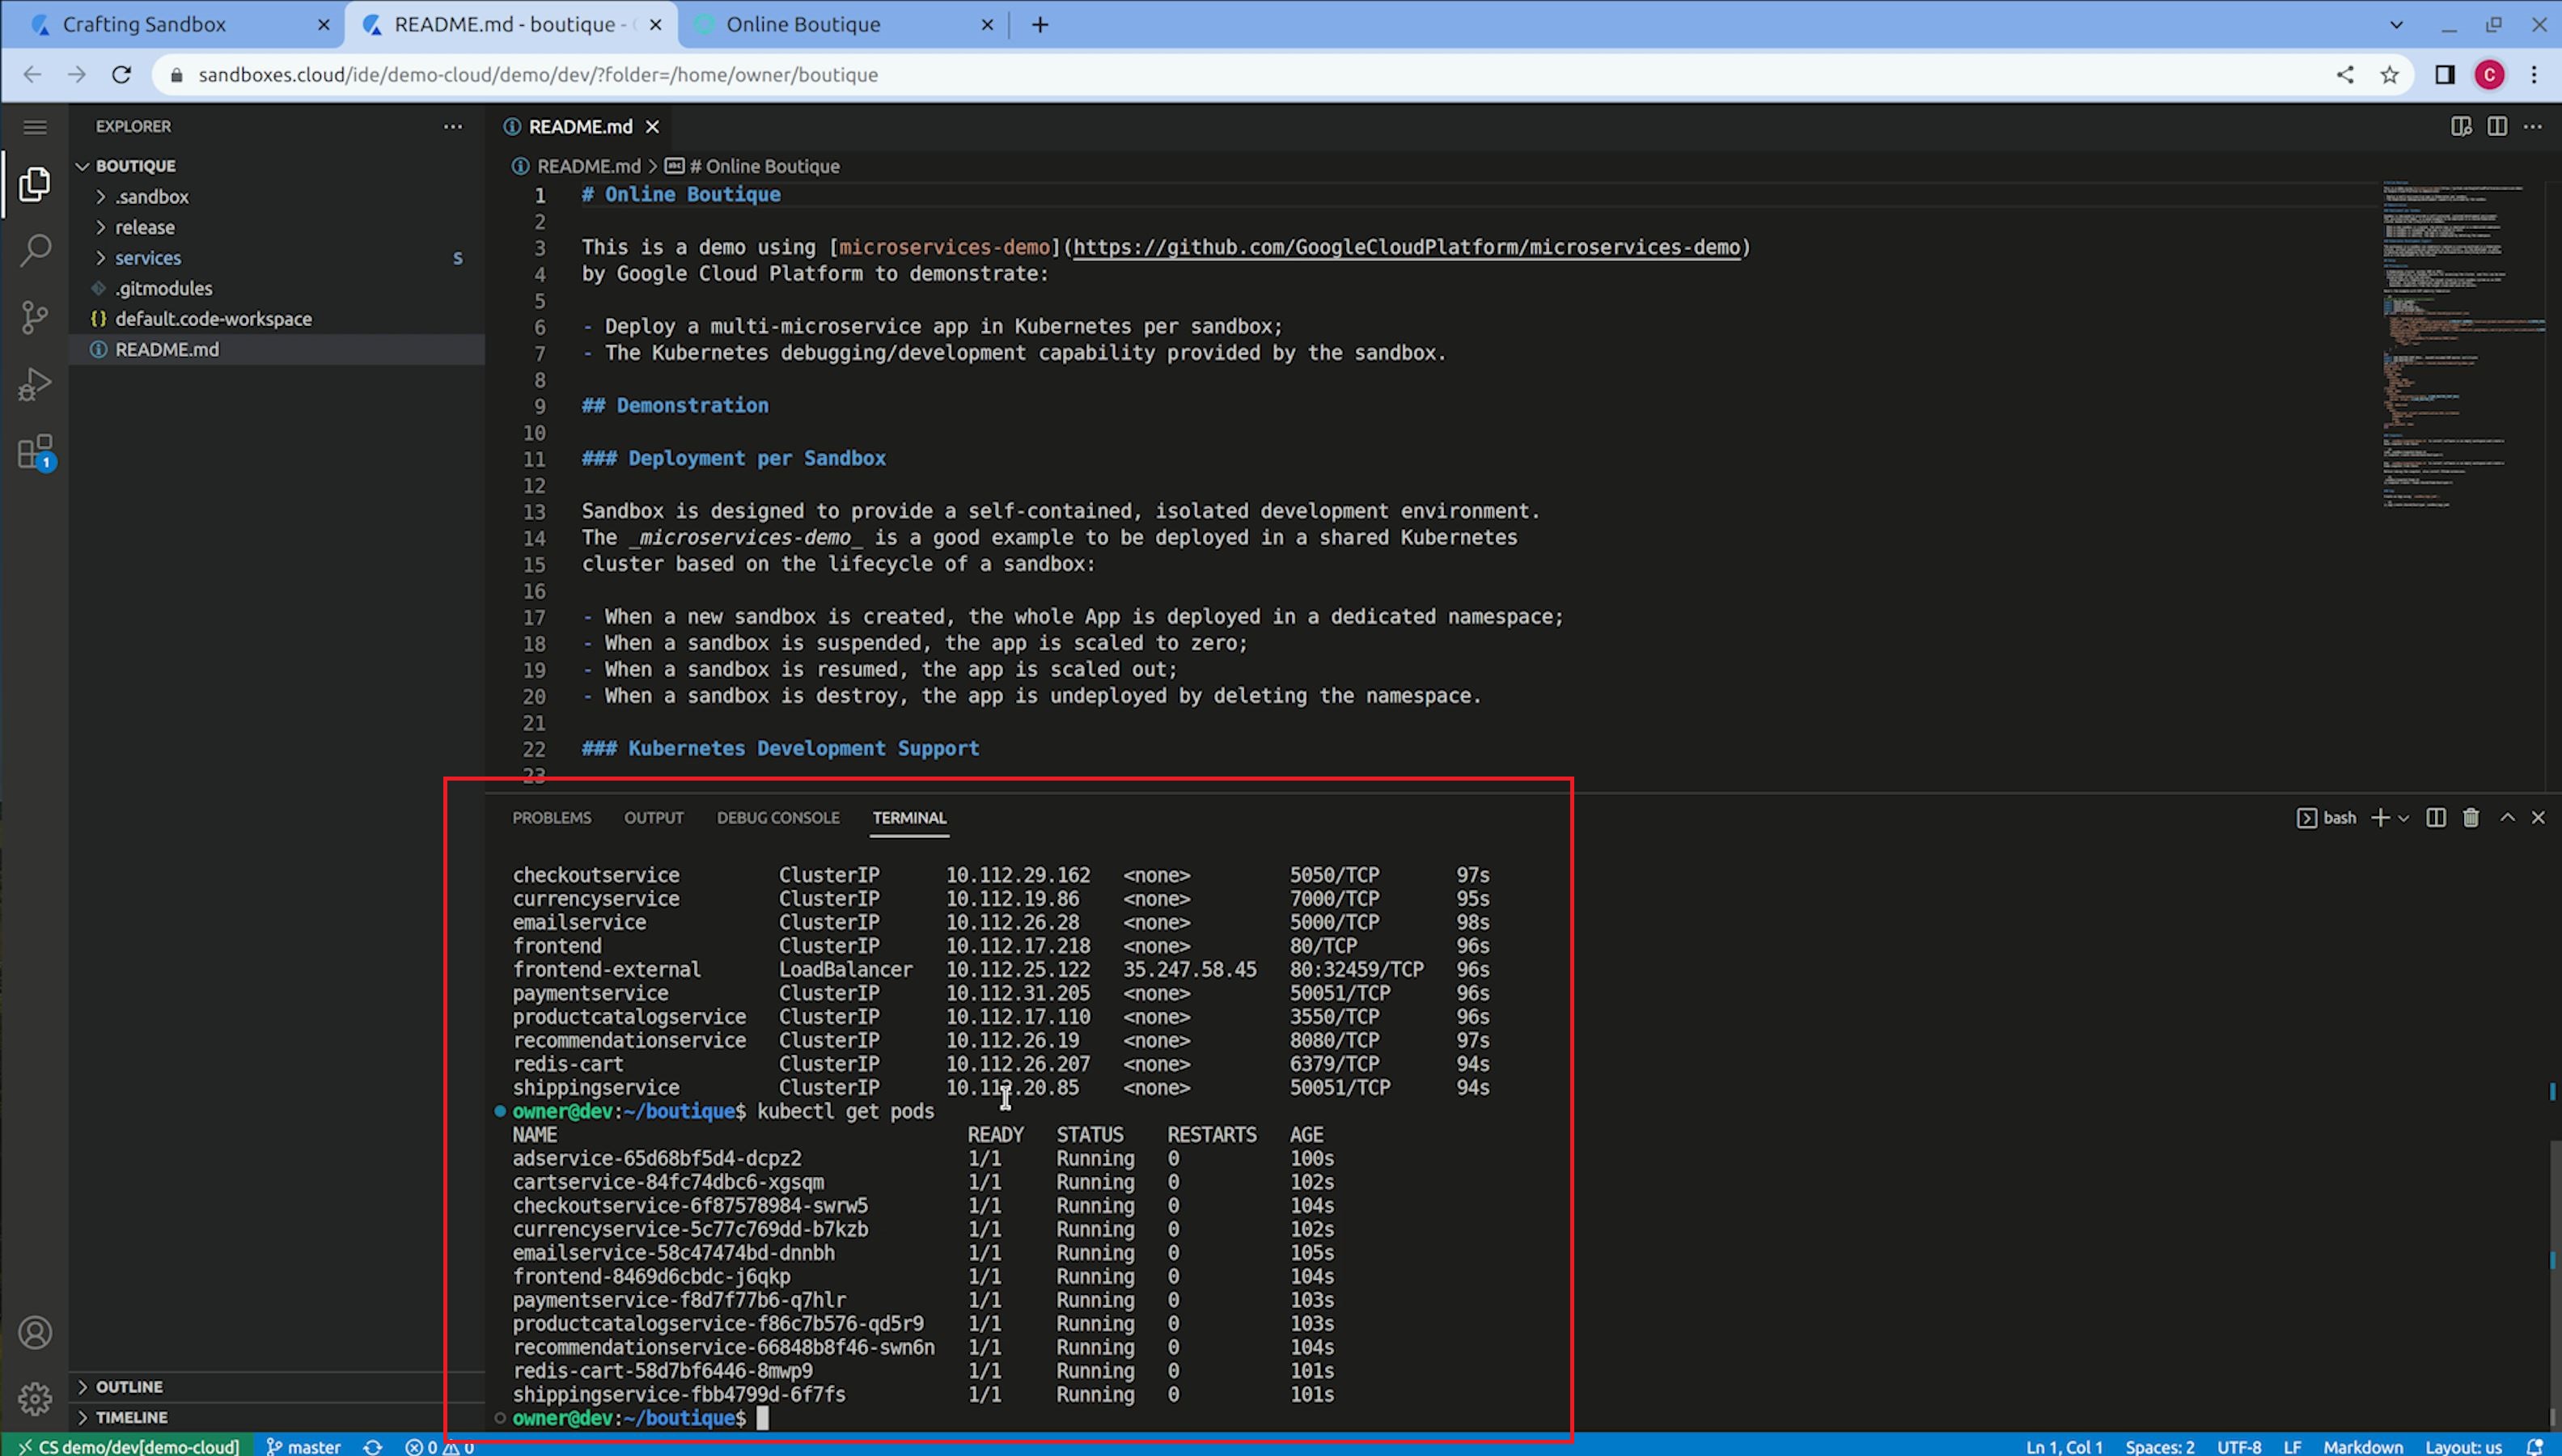
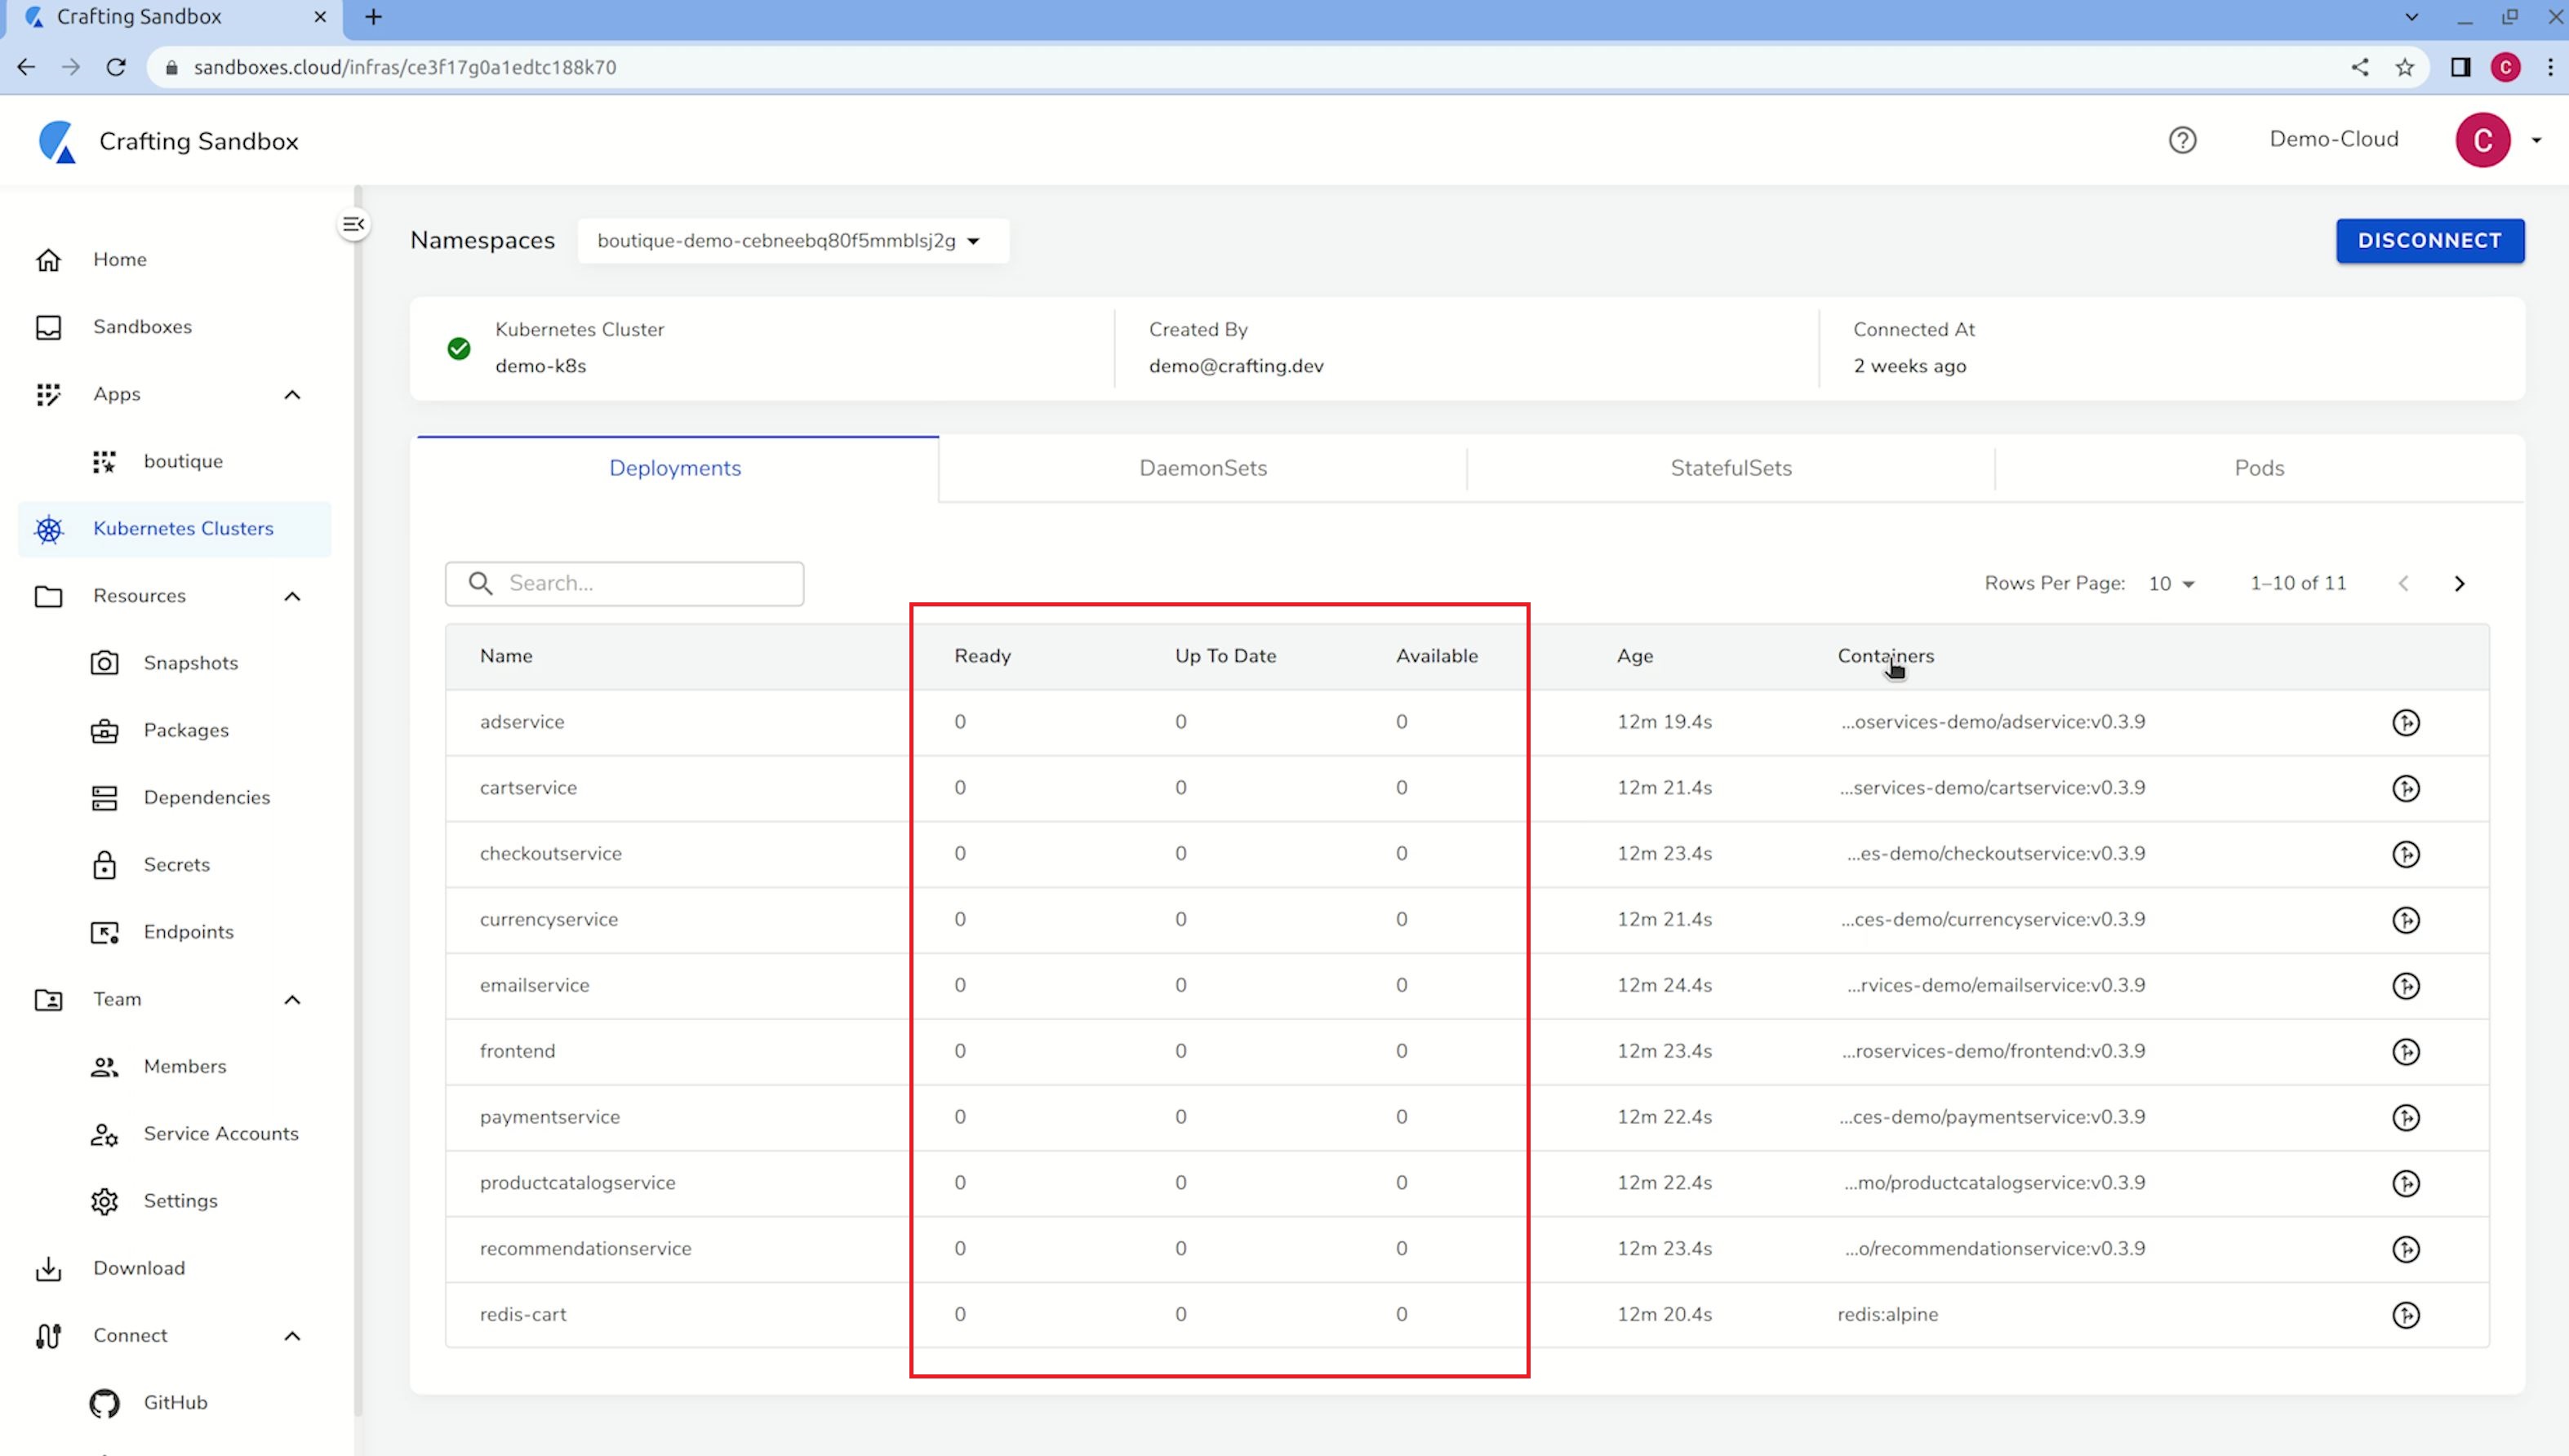
When the sandbox is launched ready, we can go into the Web IDE terminal and see that all the services in that Kubernetes namespace is up-and-running, visible to kubectl command.
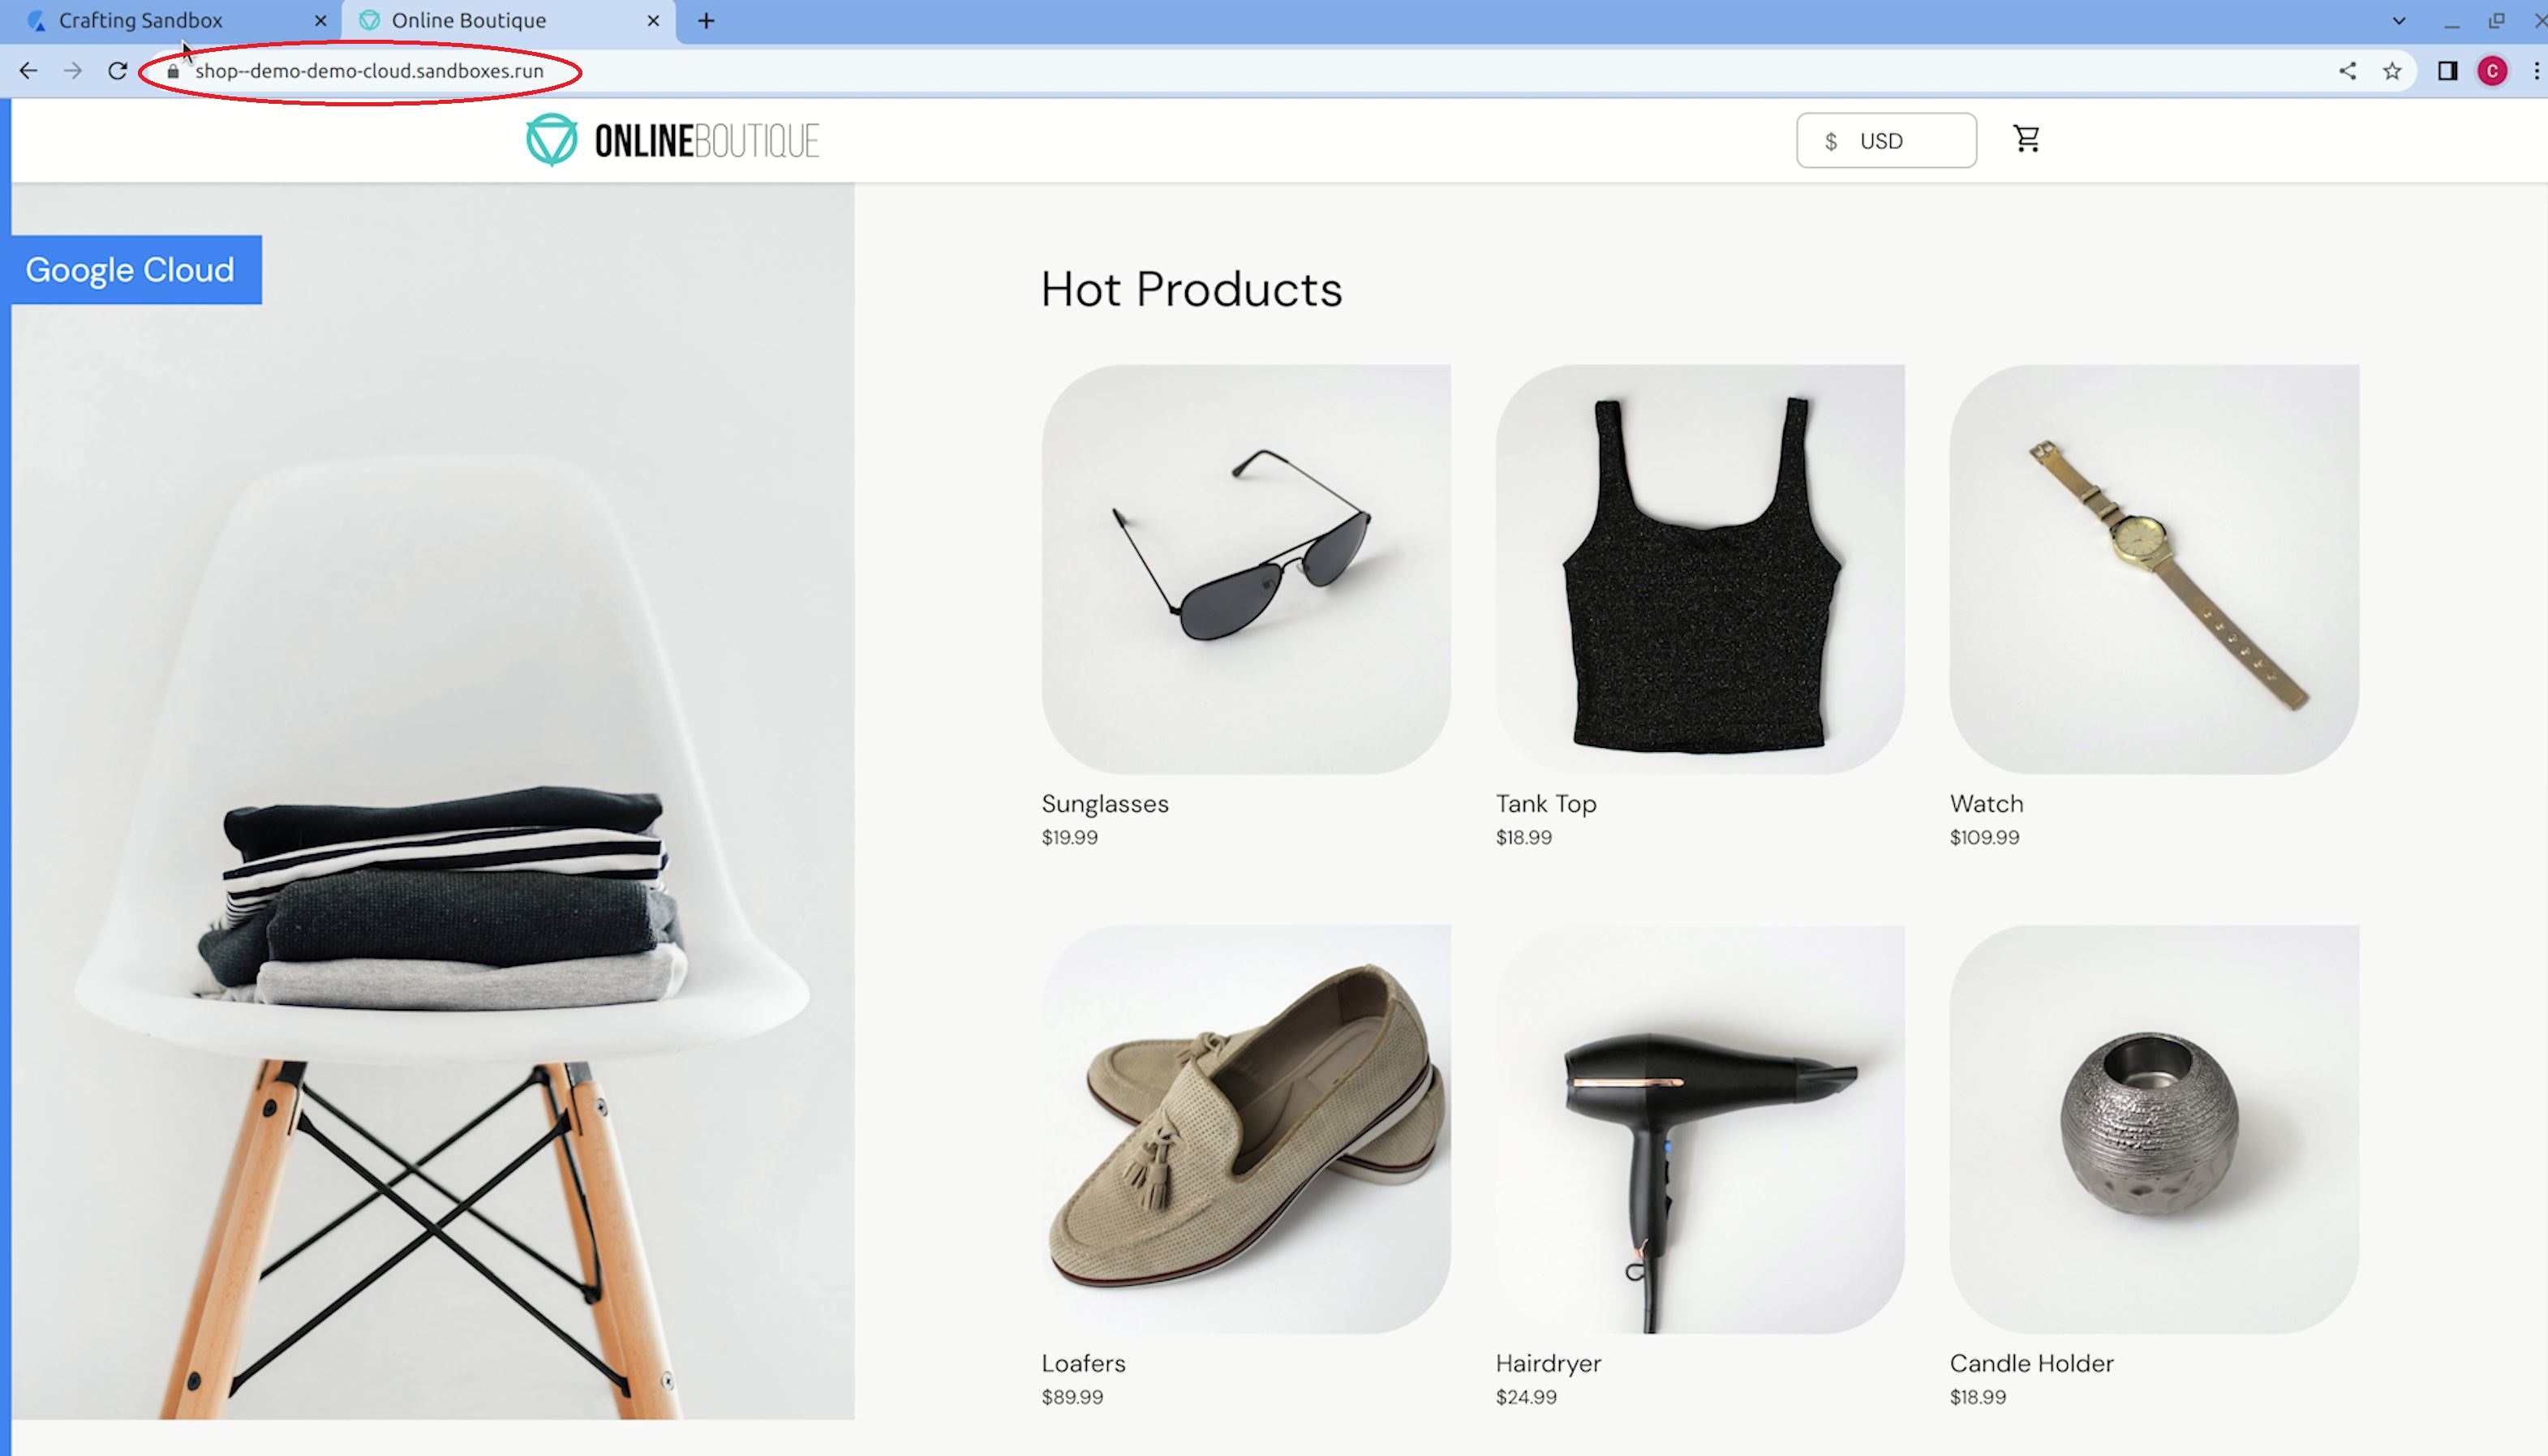
At this point, you can run the app end-to-end on Kubernetes. You can also let an sandbox endpoint point to a Kubernetes Service so that you can access the deployment as a user directly from a sandbox URL, as shown above.
Interactive debug in Kubernetes context via traffic interception
Using Crafting, when you want to test your dev version of a service in the Kubernetes context, you don't need to spend time building container, updating cluster, etc. Instead, you can directly "replace" the service running in Kubernetes namespace with the dev version running in sandbox via traffic interception. This way, you can instantly see your code change without the need of rebuilding container or modifying Kubernetes config, greatly shortened iteration cycle.
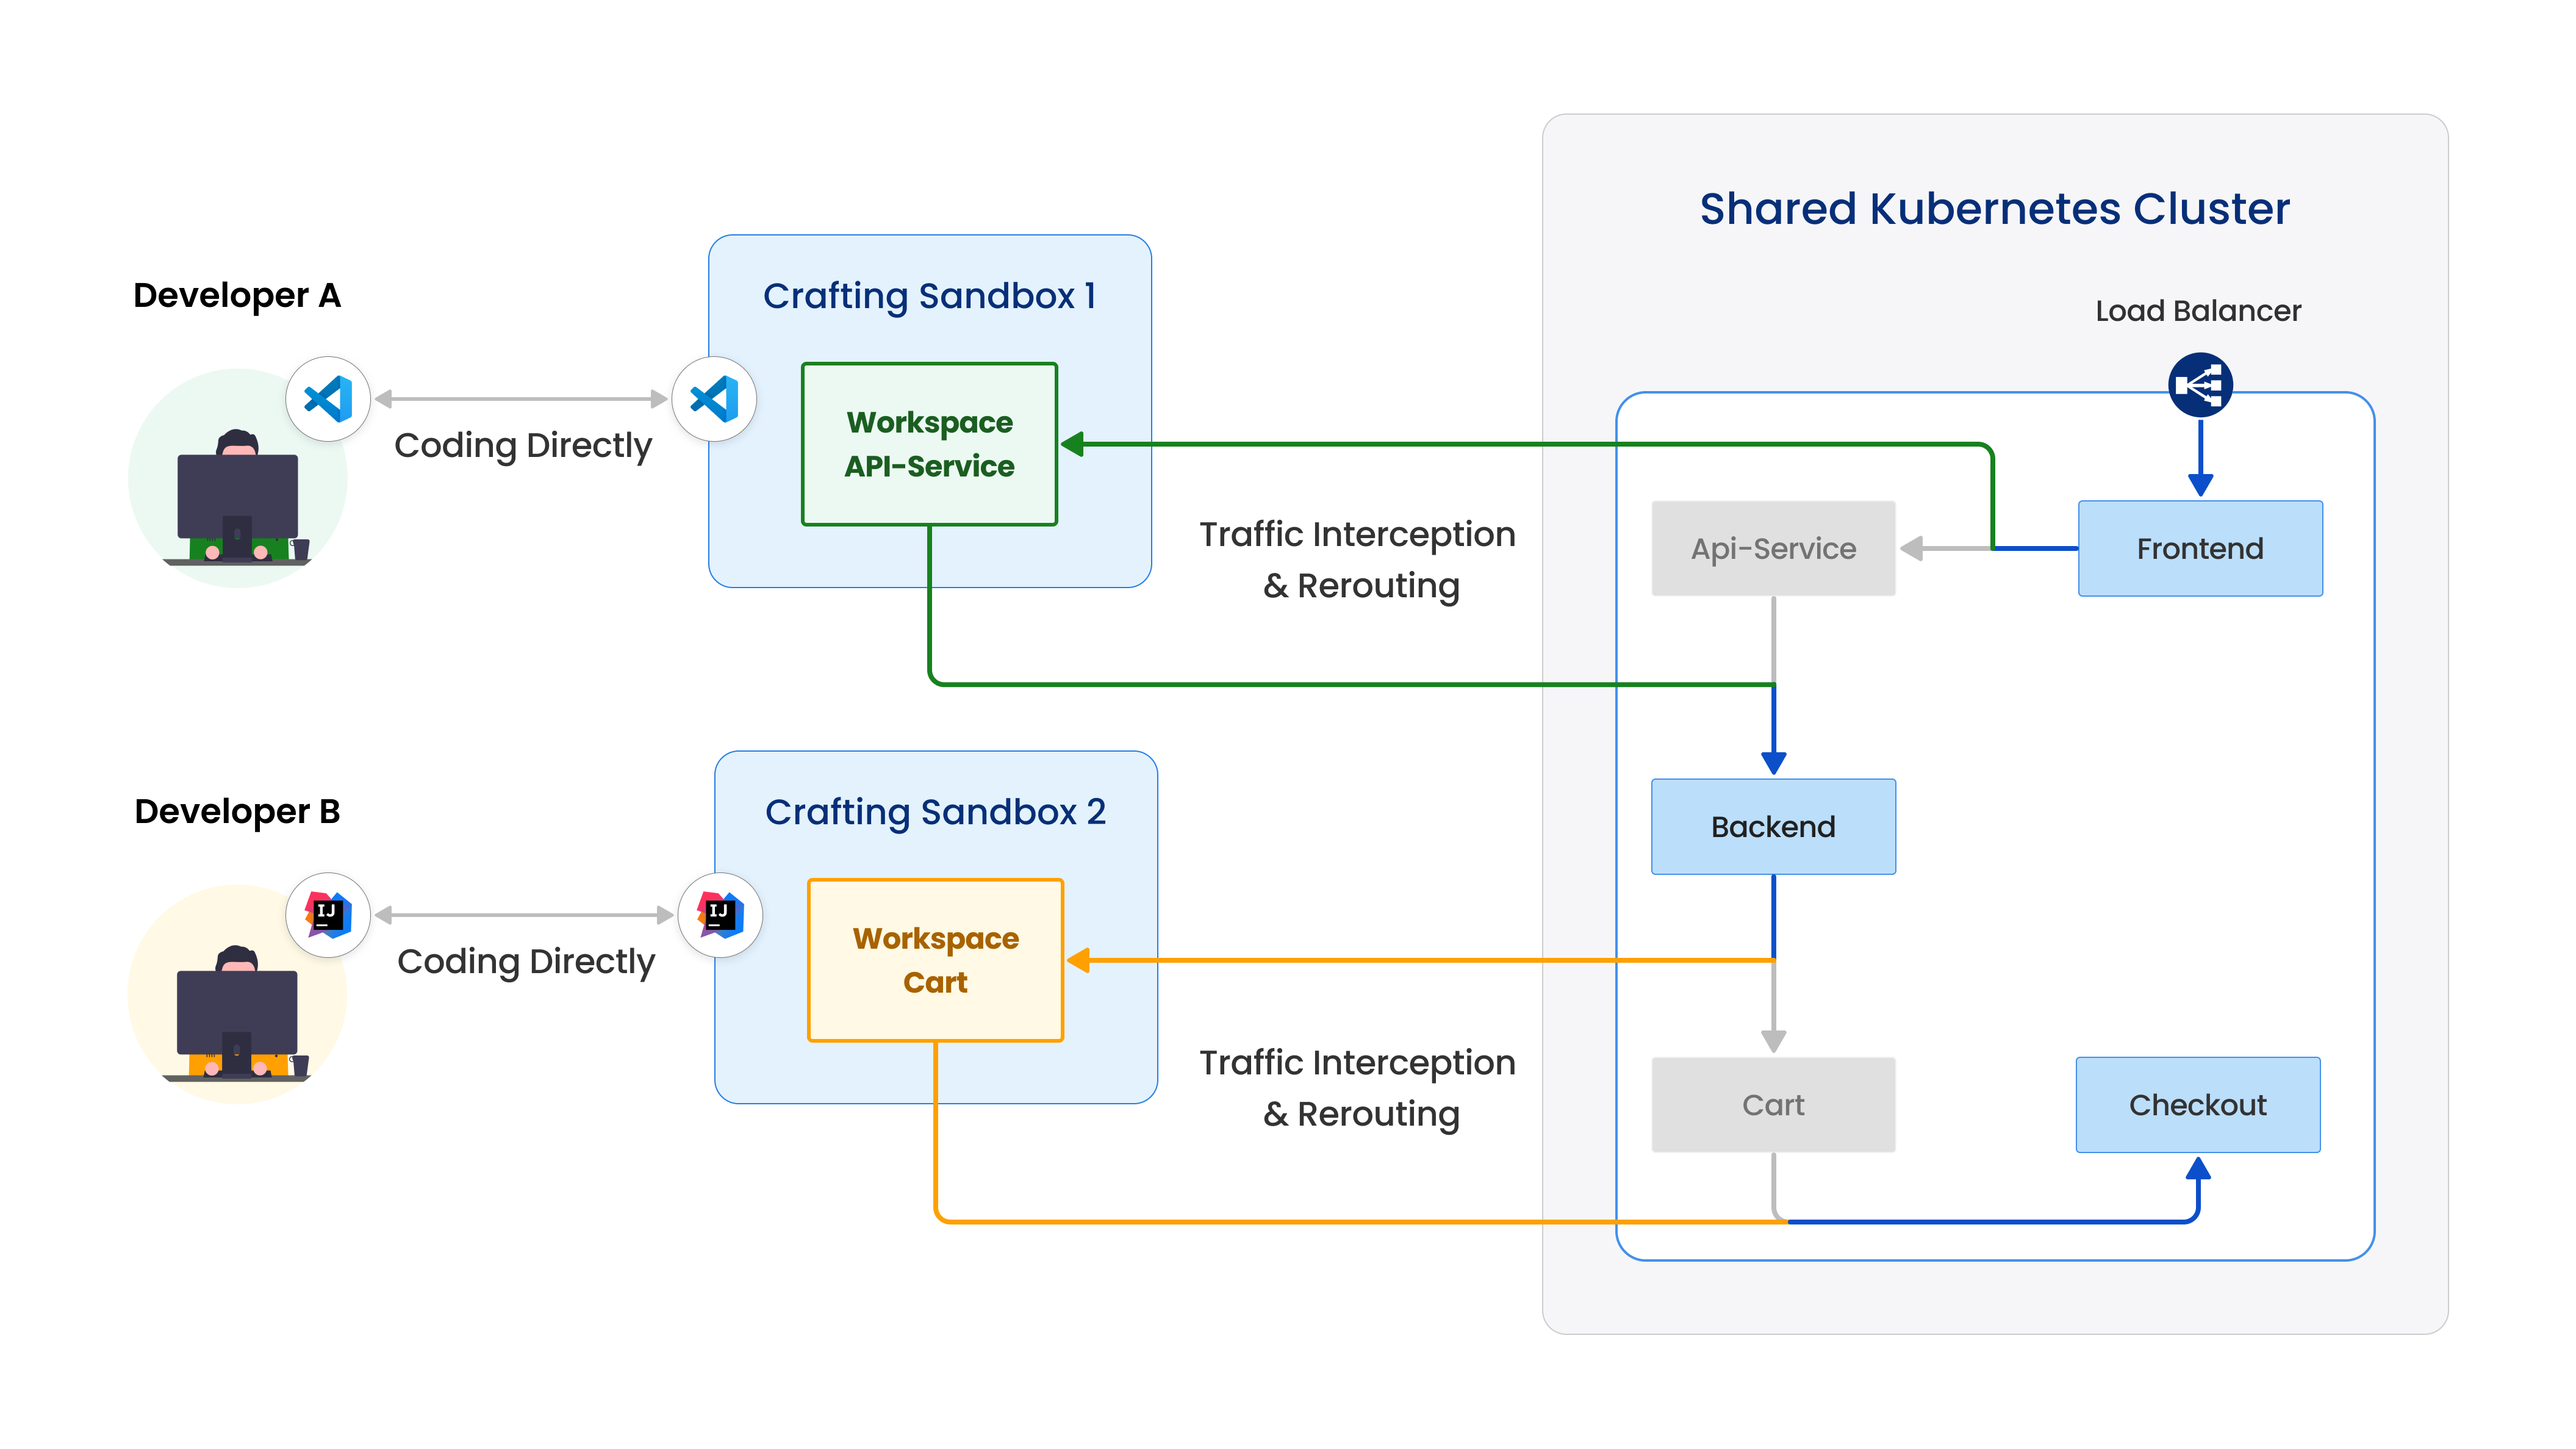
As shown above, the traffic interception is a two-way process. Firstly, all the incoming traffic going into the service you intercept is routed to the corresponding workspace, where you run your dev version of the service to debug. Secondly, the workspace is virtually added to the Kubernetes network so that all the outgoing traffic from your dev version to other services can hit their intended target directly using the same DNS names in the cluster or even IP addresses of Pods.
Multiple interceptions can be done at the same time to the same or different workspaces, enabling integration debugging on multiple services or collaboration between teammates. In advanced mode, interception can be done conditionally so that multiple team members can share a large Kubernetes deployment as base, and only redirect their own testing traffic to their corresponding workspaces. That is ideal for a large team working on a large number of microservices.
Now let's see how it works step by step
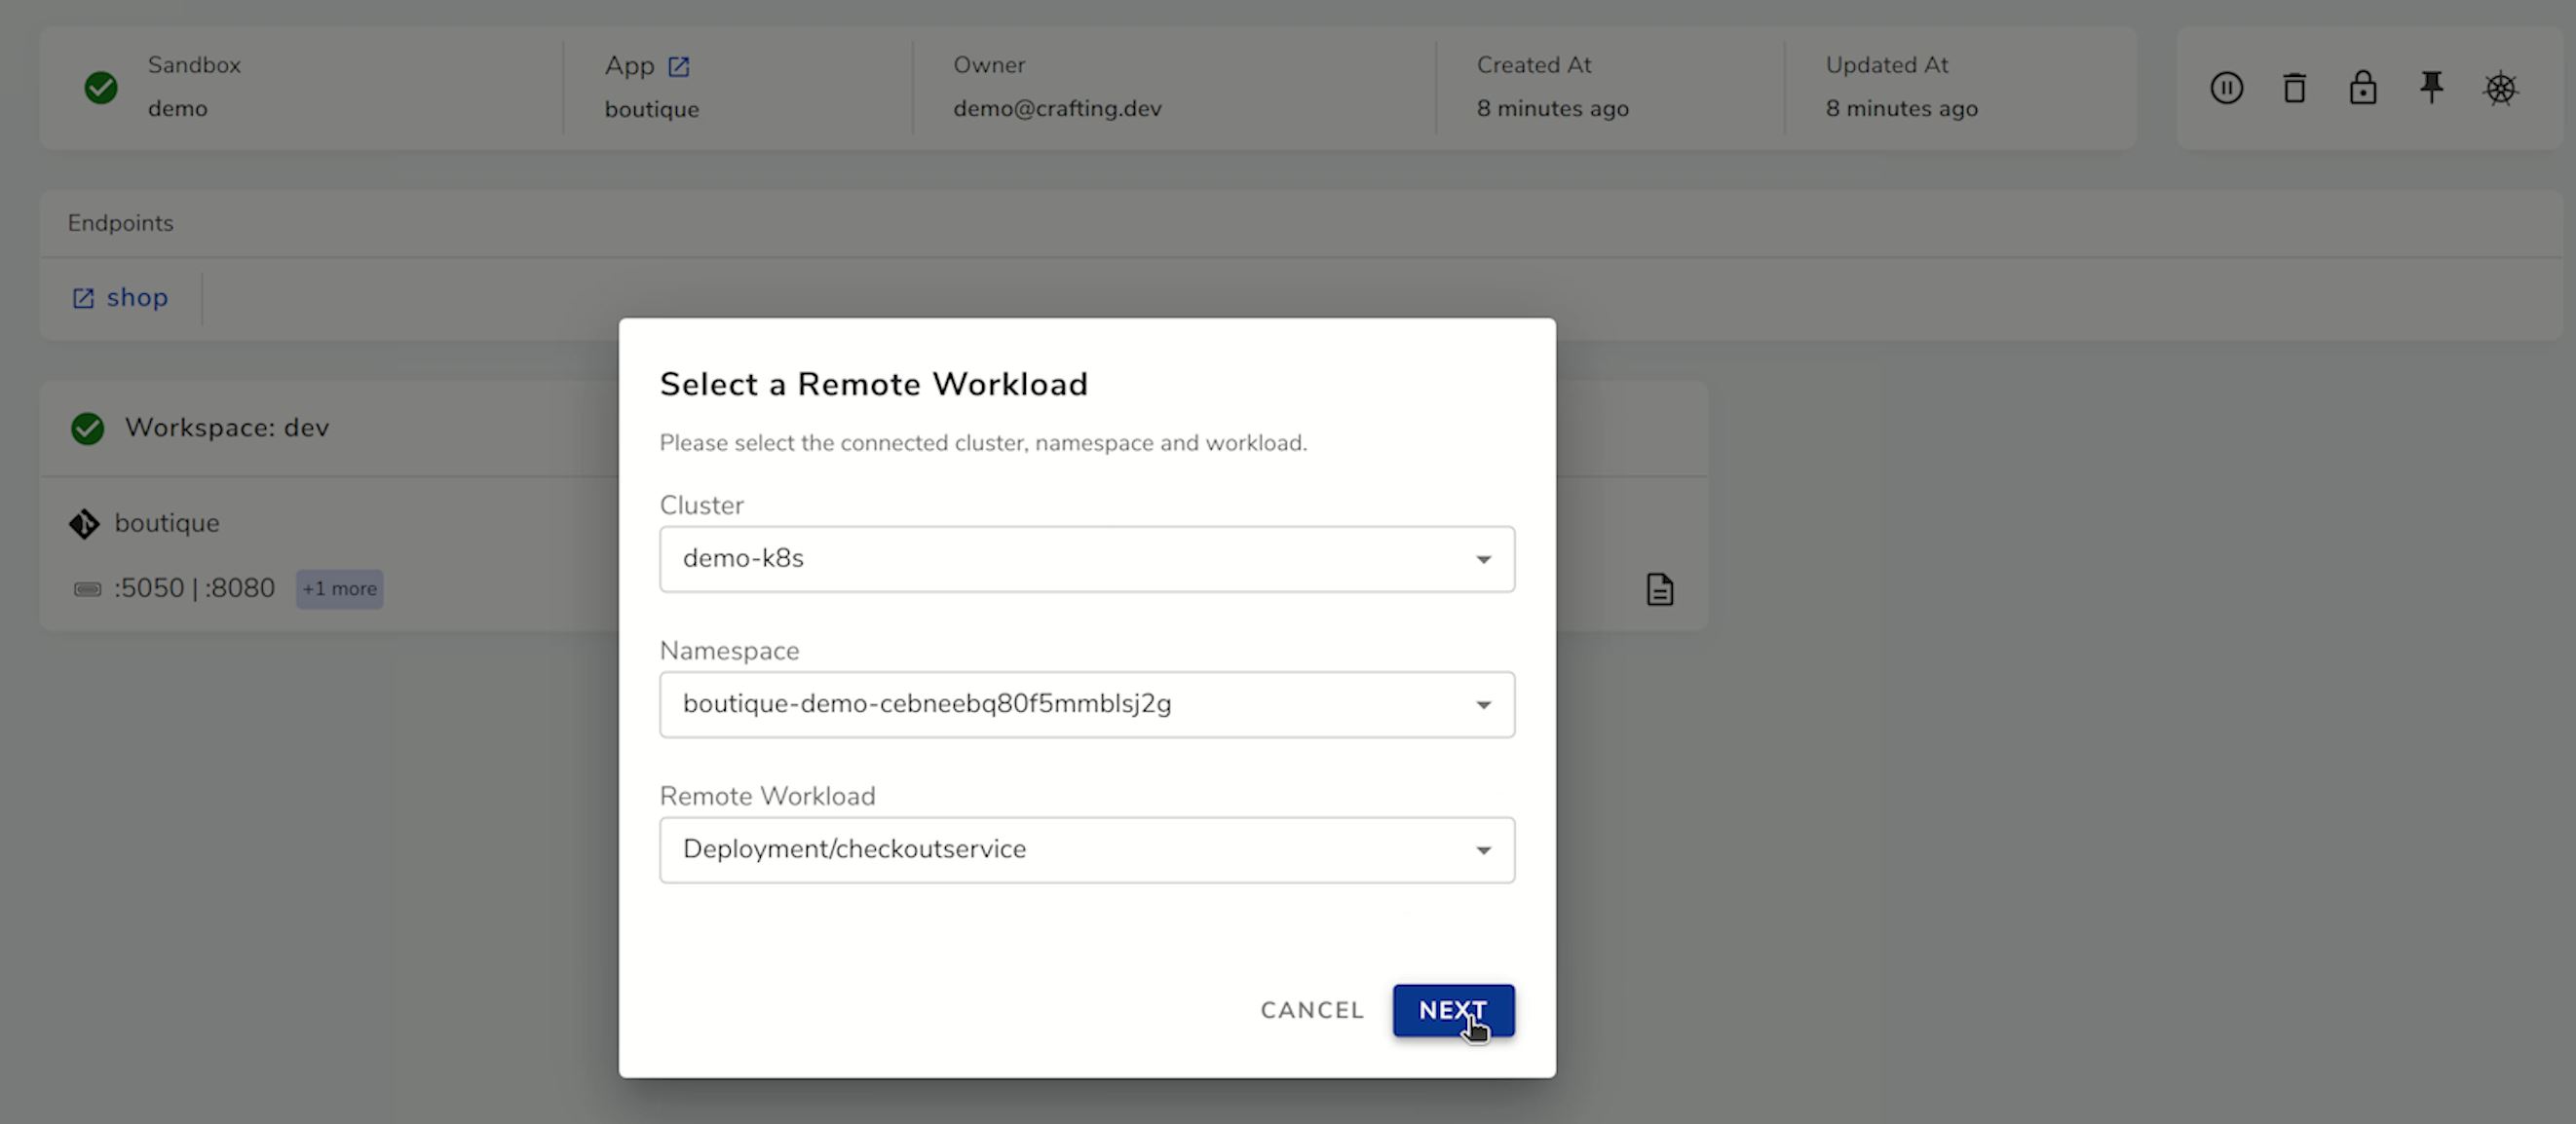
As shown above, you can initiate interception directly from sandbox page, by selecting cluster, namespace, and remote workload. In the next step, you select which workspace in the sandbox you want to intercept to and which port.
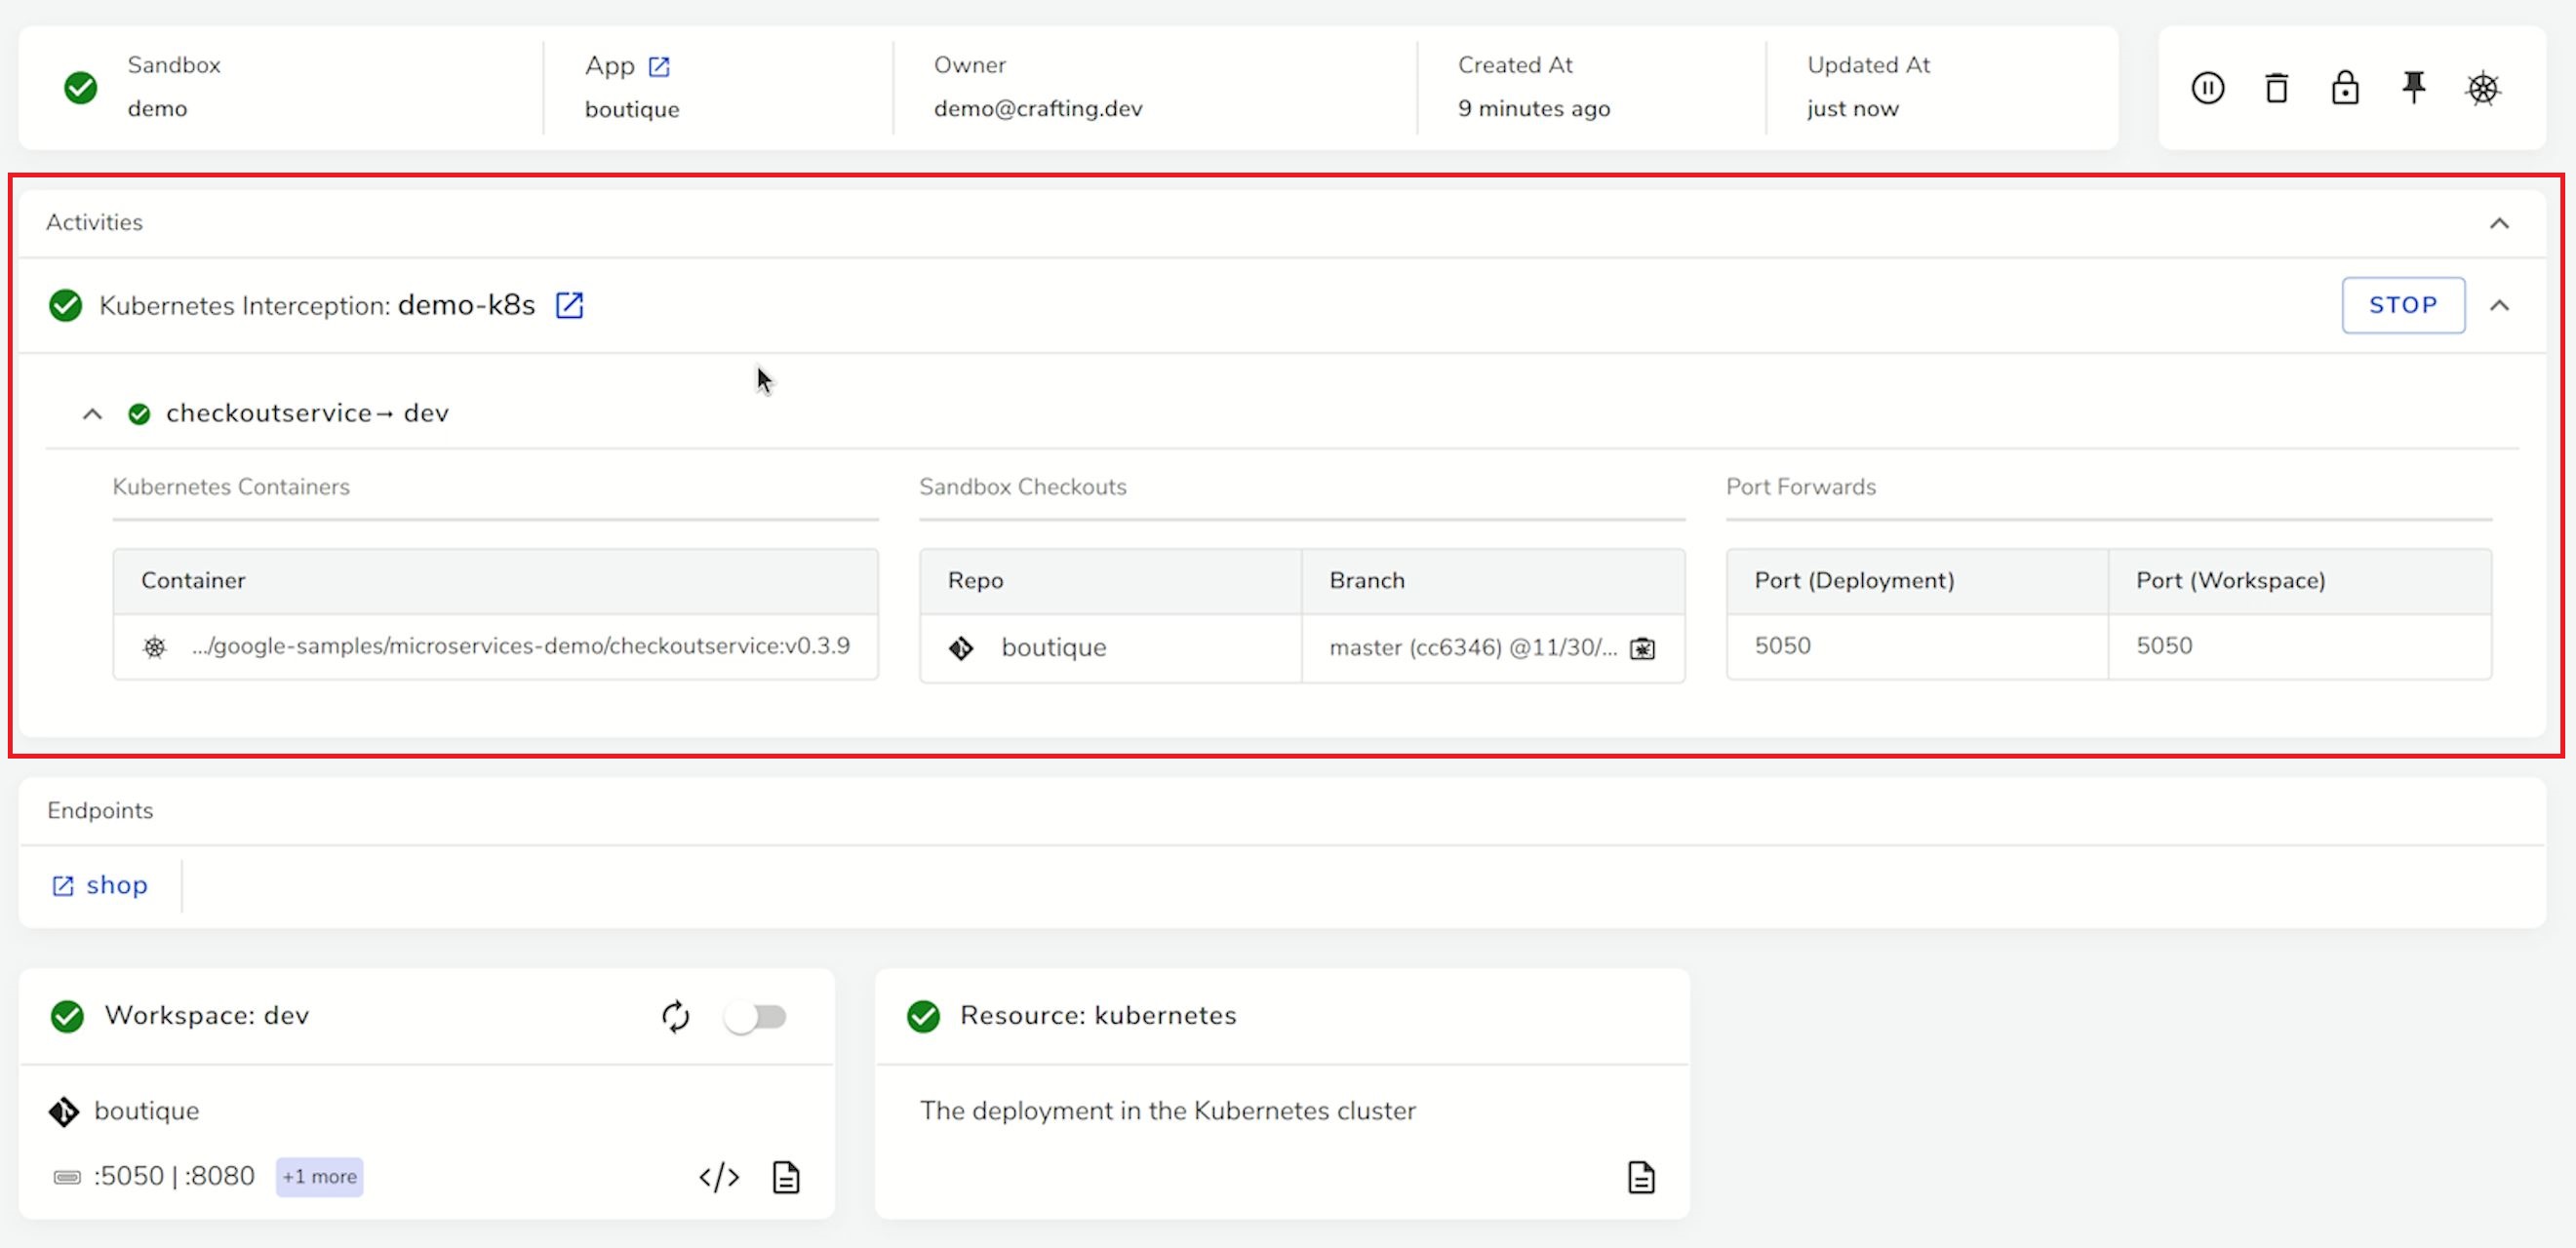
After interception is set, you can see the ongoing active interception in the sandbox page showing the details of the interception status, you can stop the interception at any time here too. Now, let's open the Web IDE and make some modification to the dev version of the service running in the workspace.
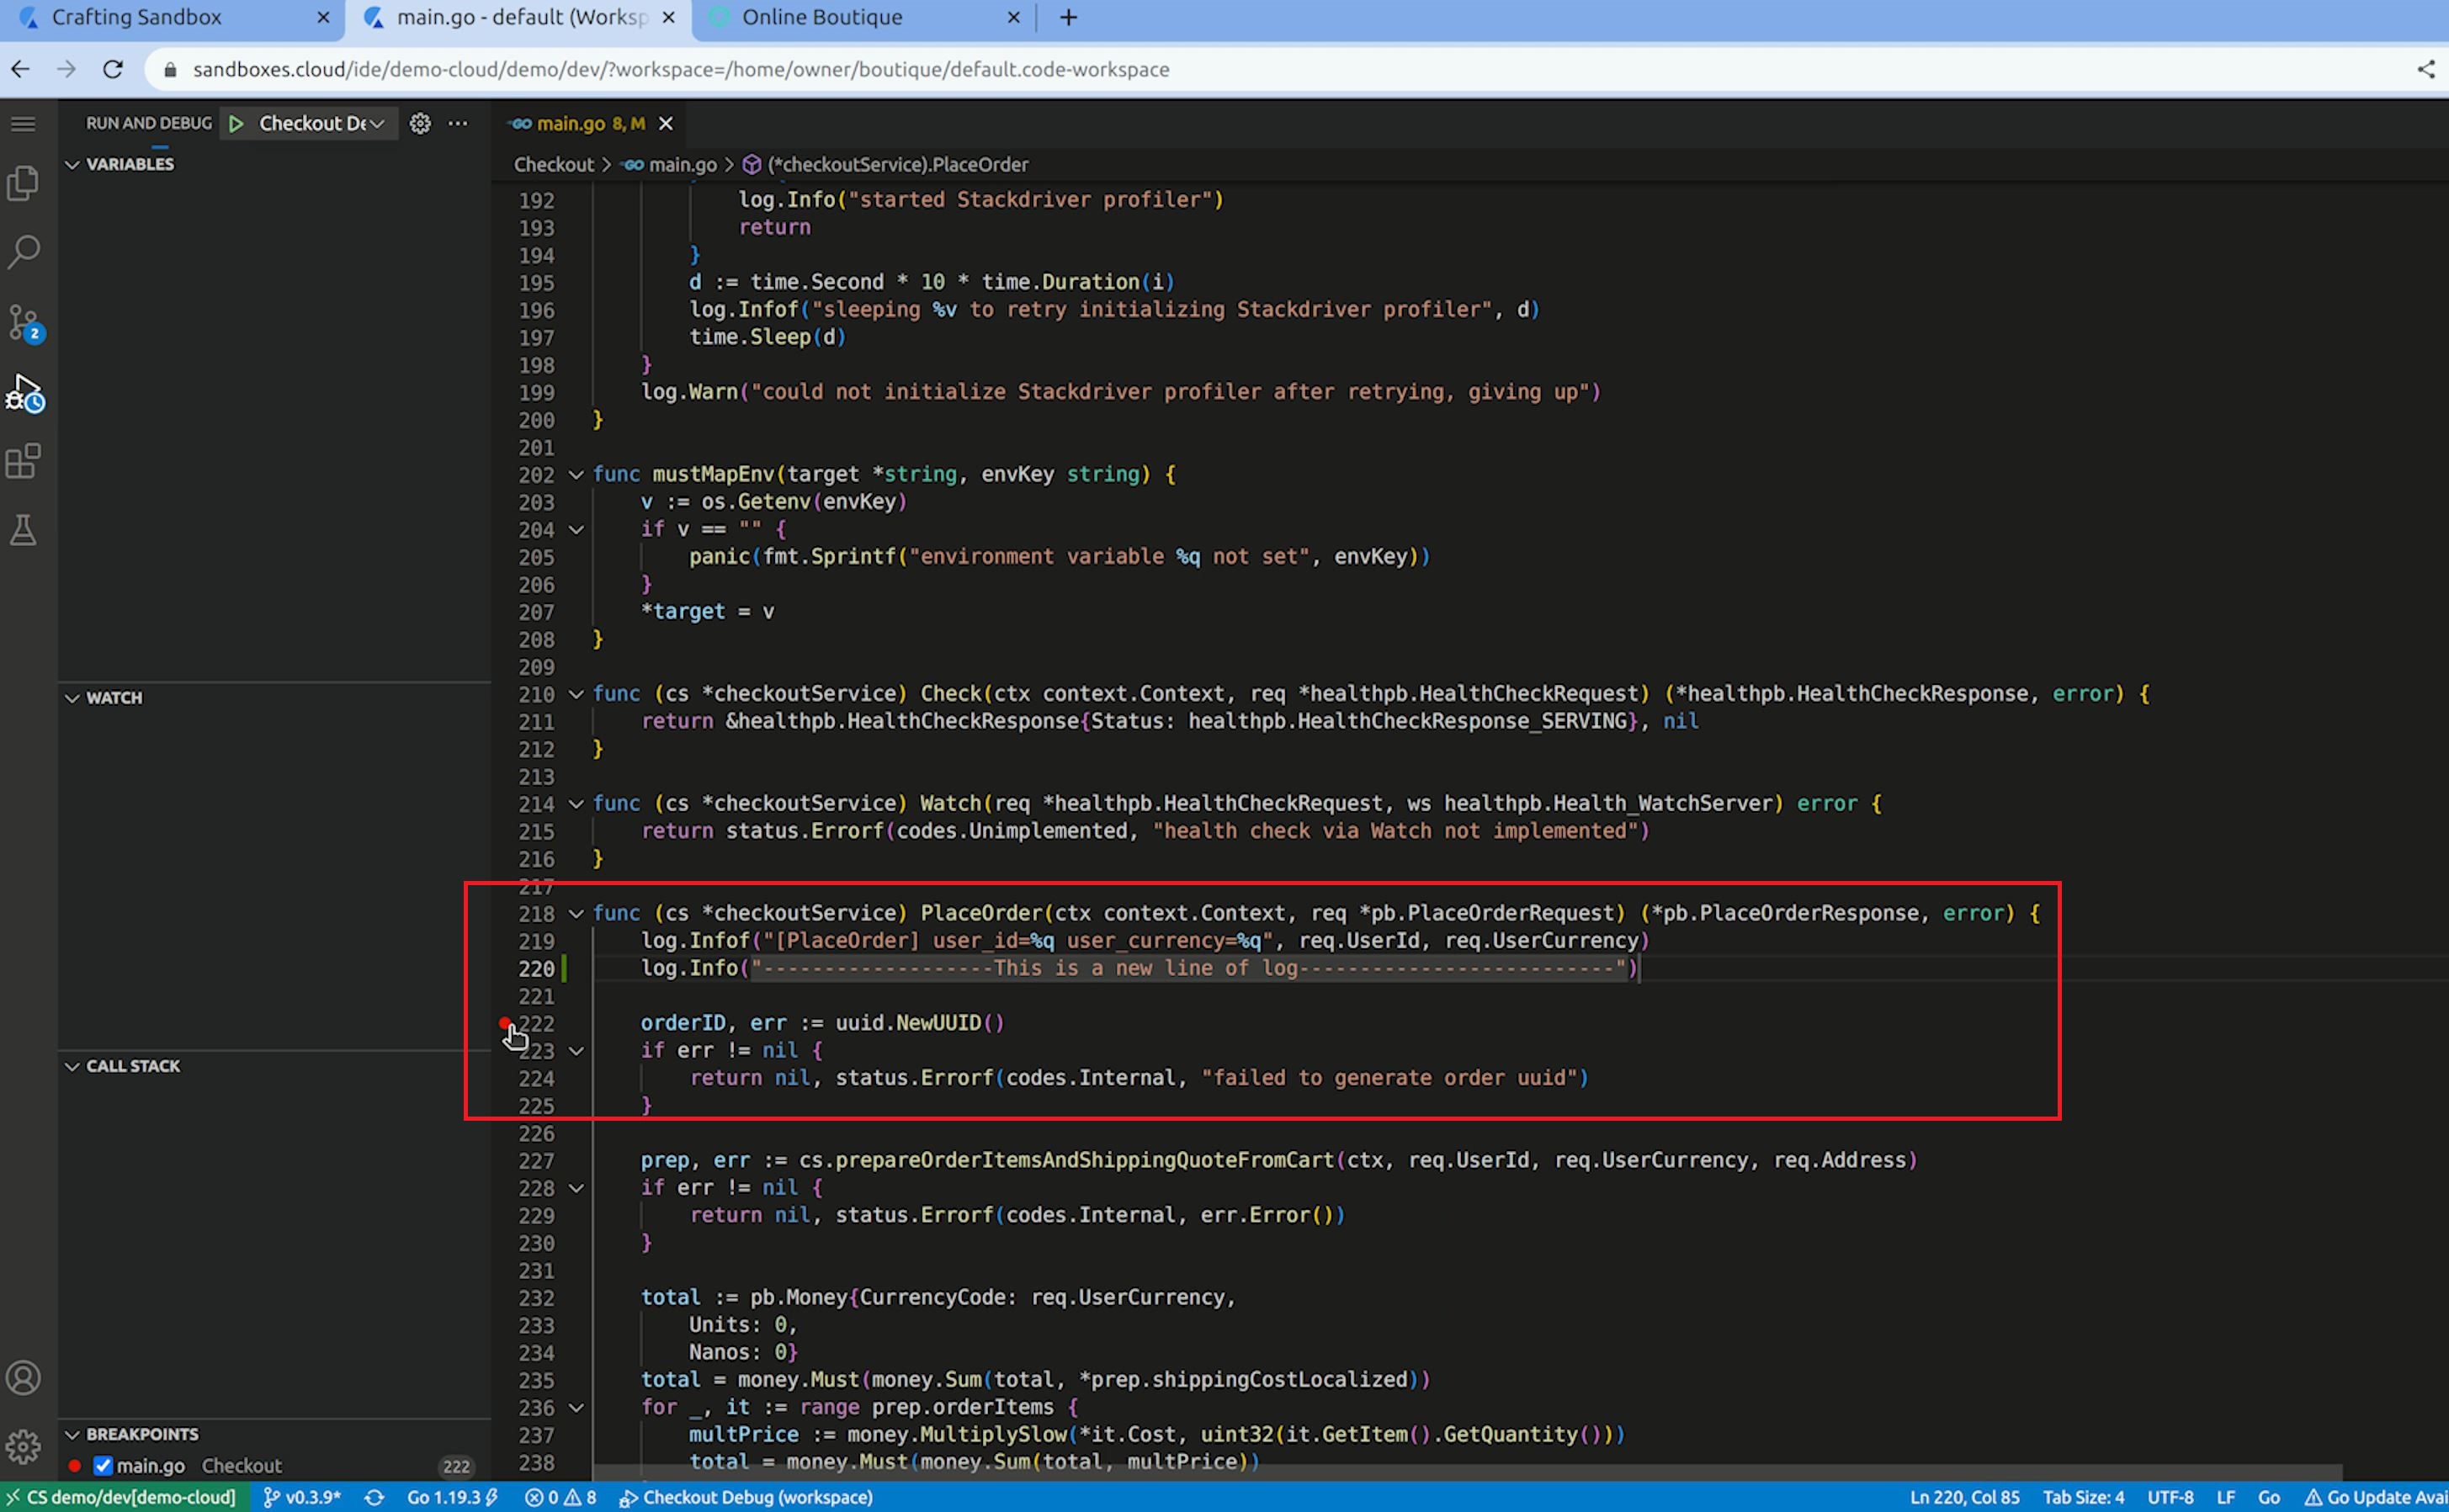
As shown above, you can see that we added one line of log in the PlaceOrder function in the checkout service, and we also placed a breakpoint on the line below our new logging.
Now, we run the dev version of the service on the workspace in debug mode and can go to the product page and initiate a product flow.
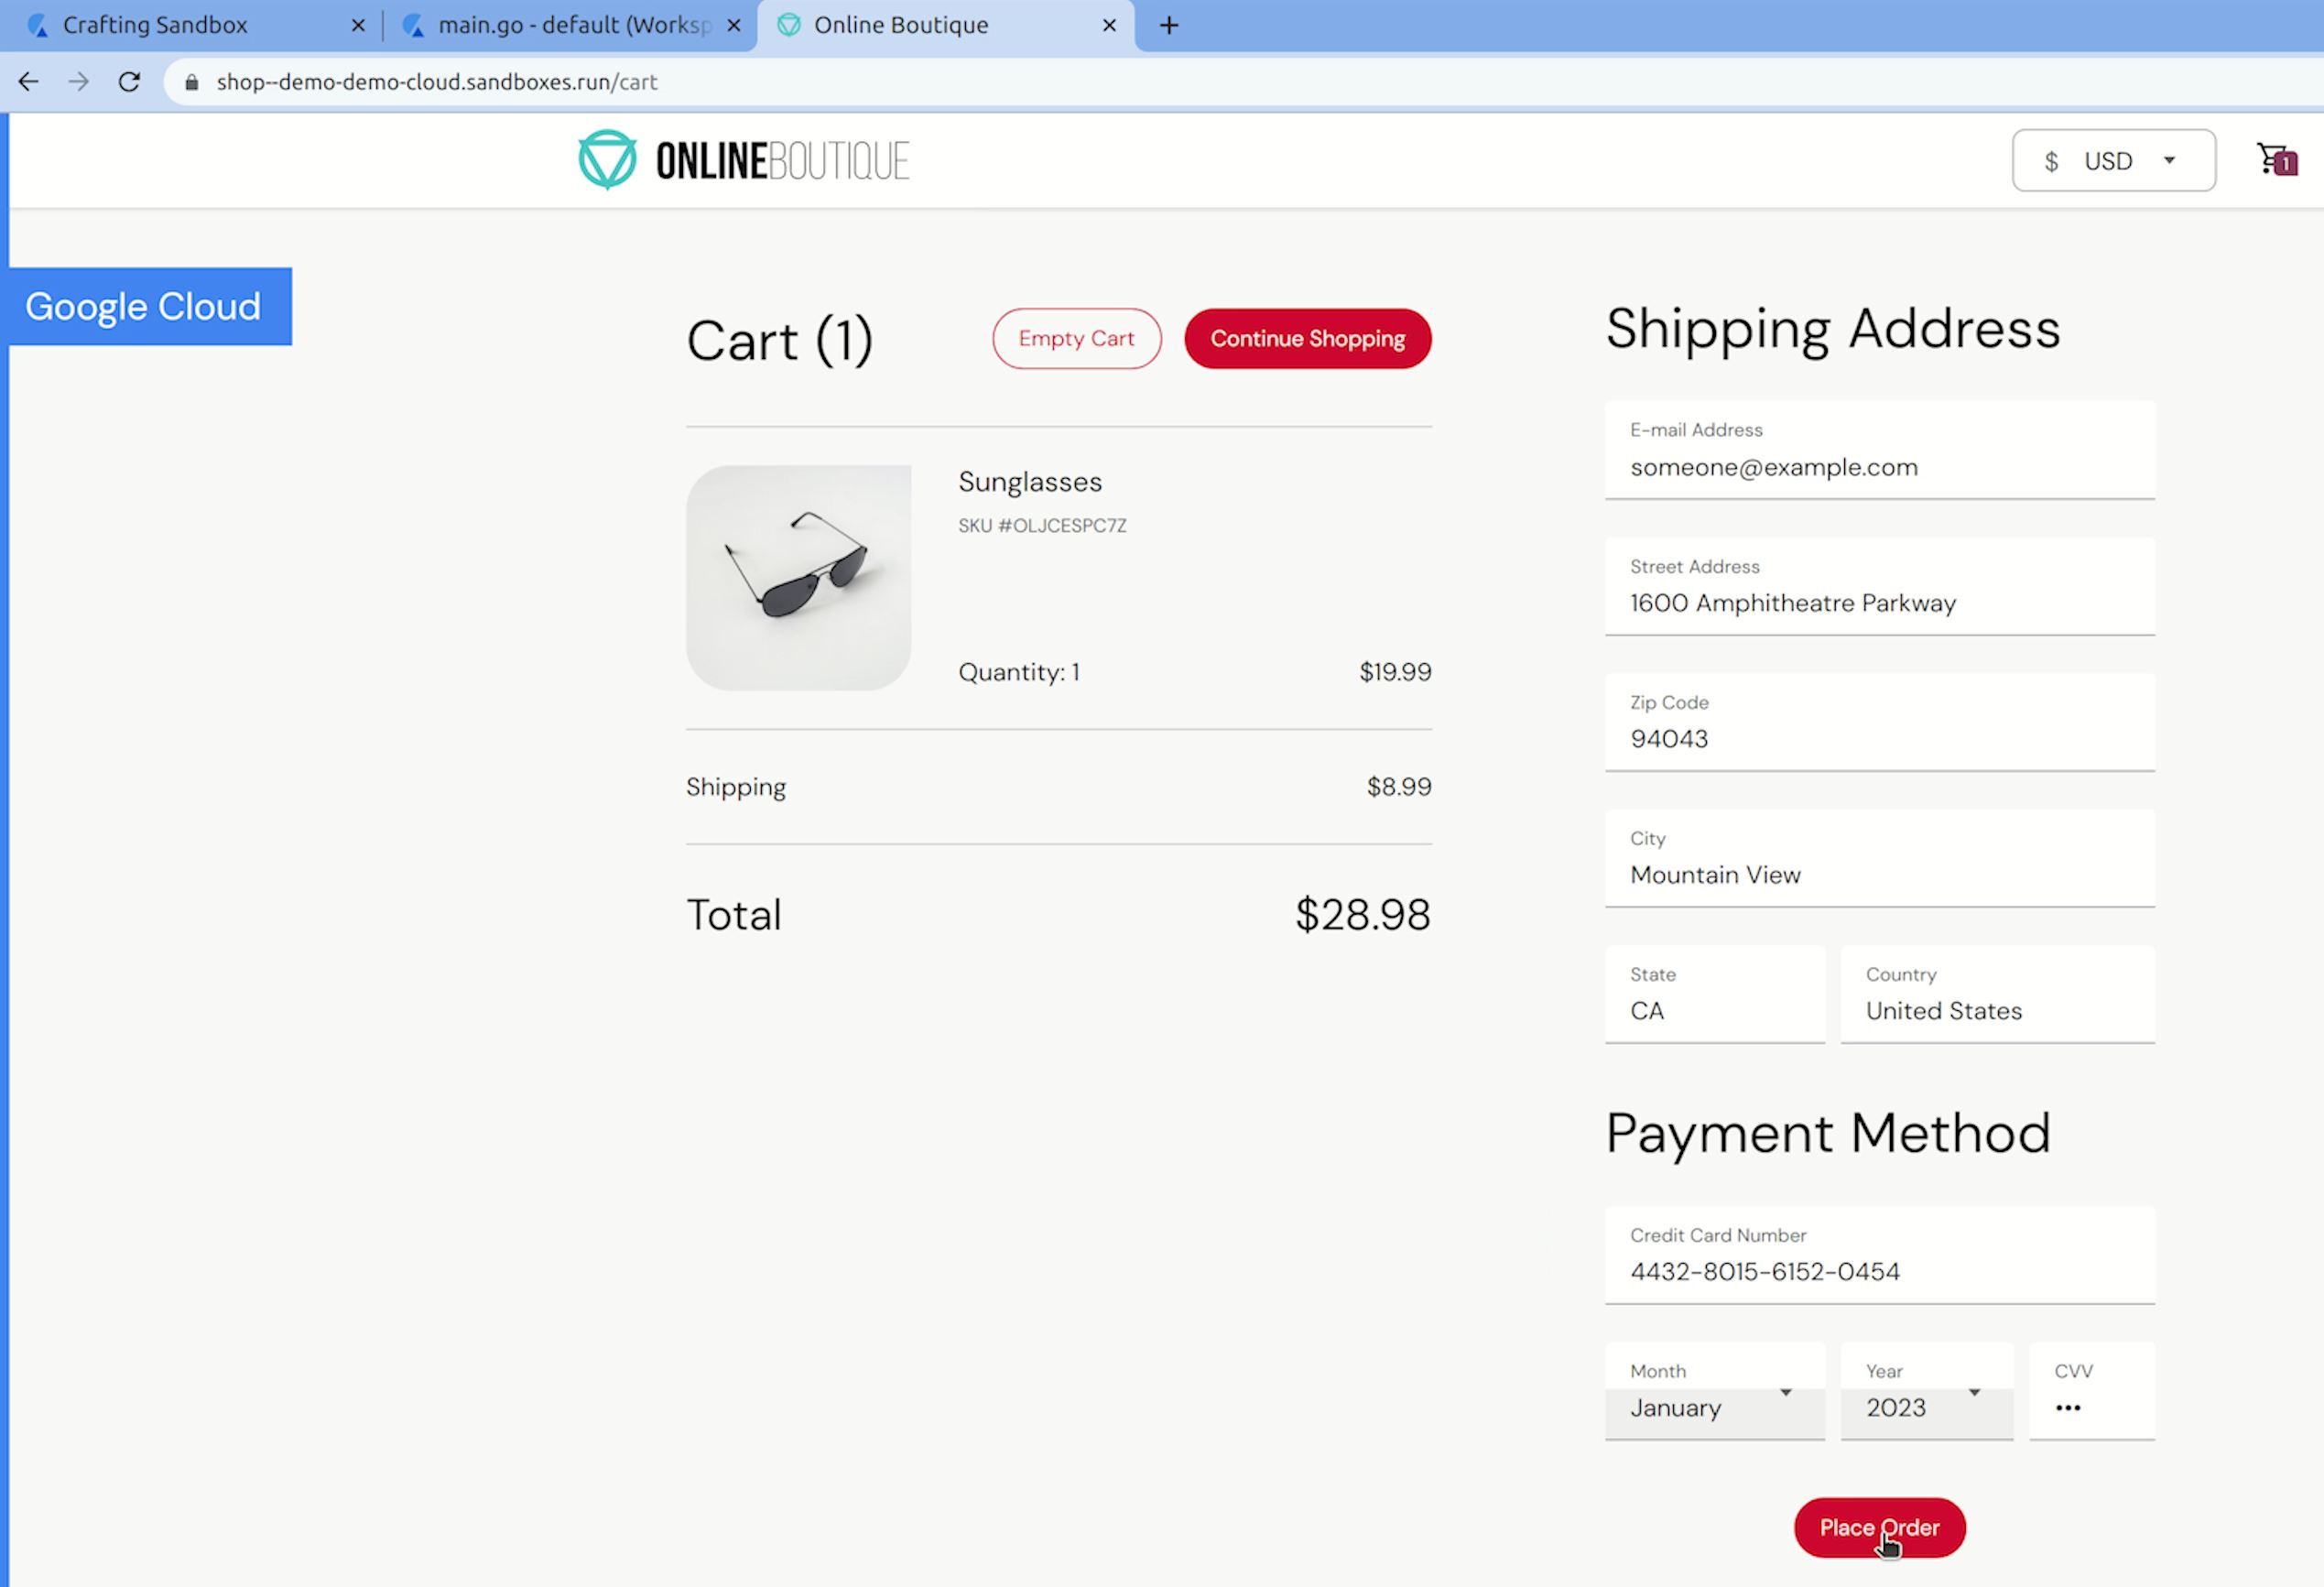
Given the we are replacing the checkout service and changed the code in the PlaceOrder function, we will trigger that flow by going to the shopping cart and place an order.
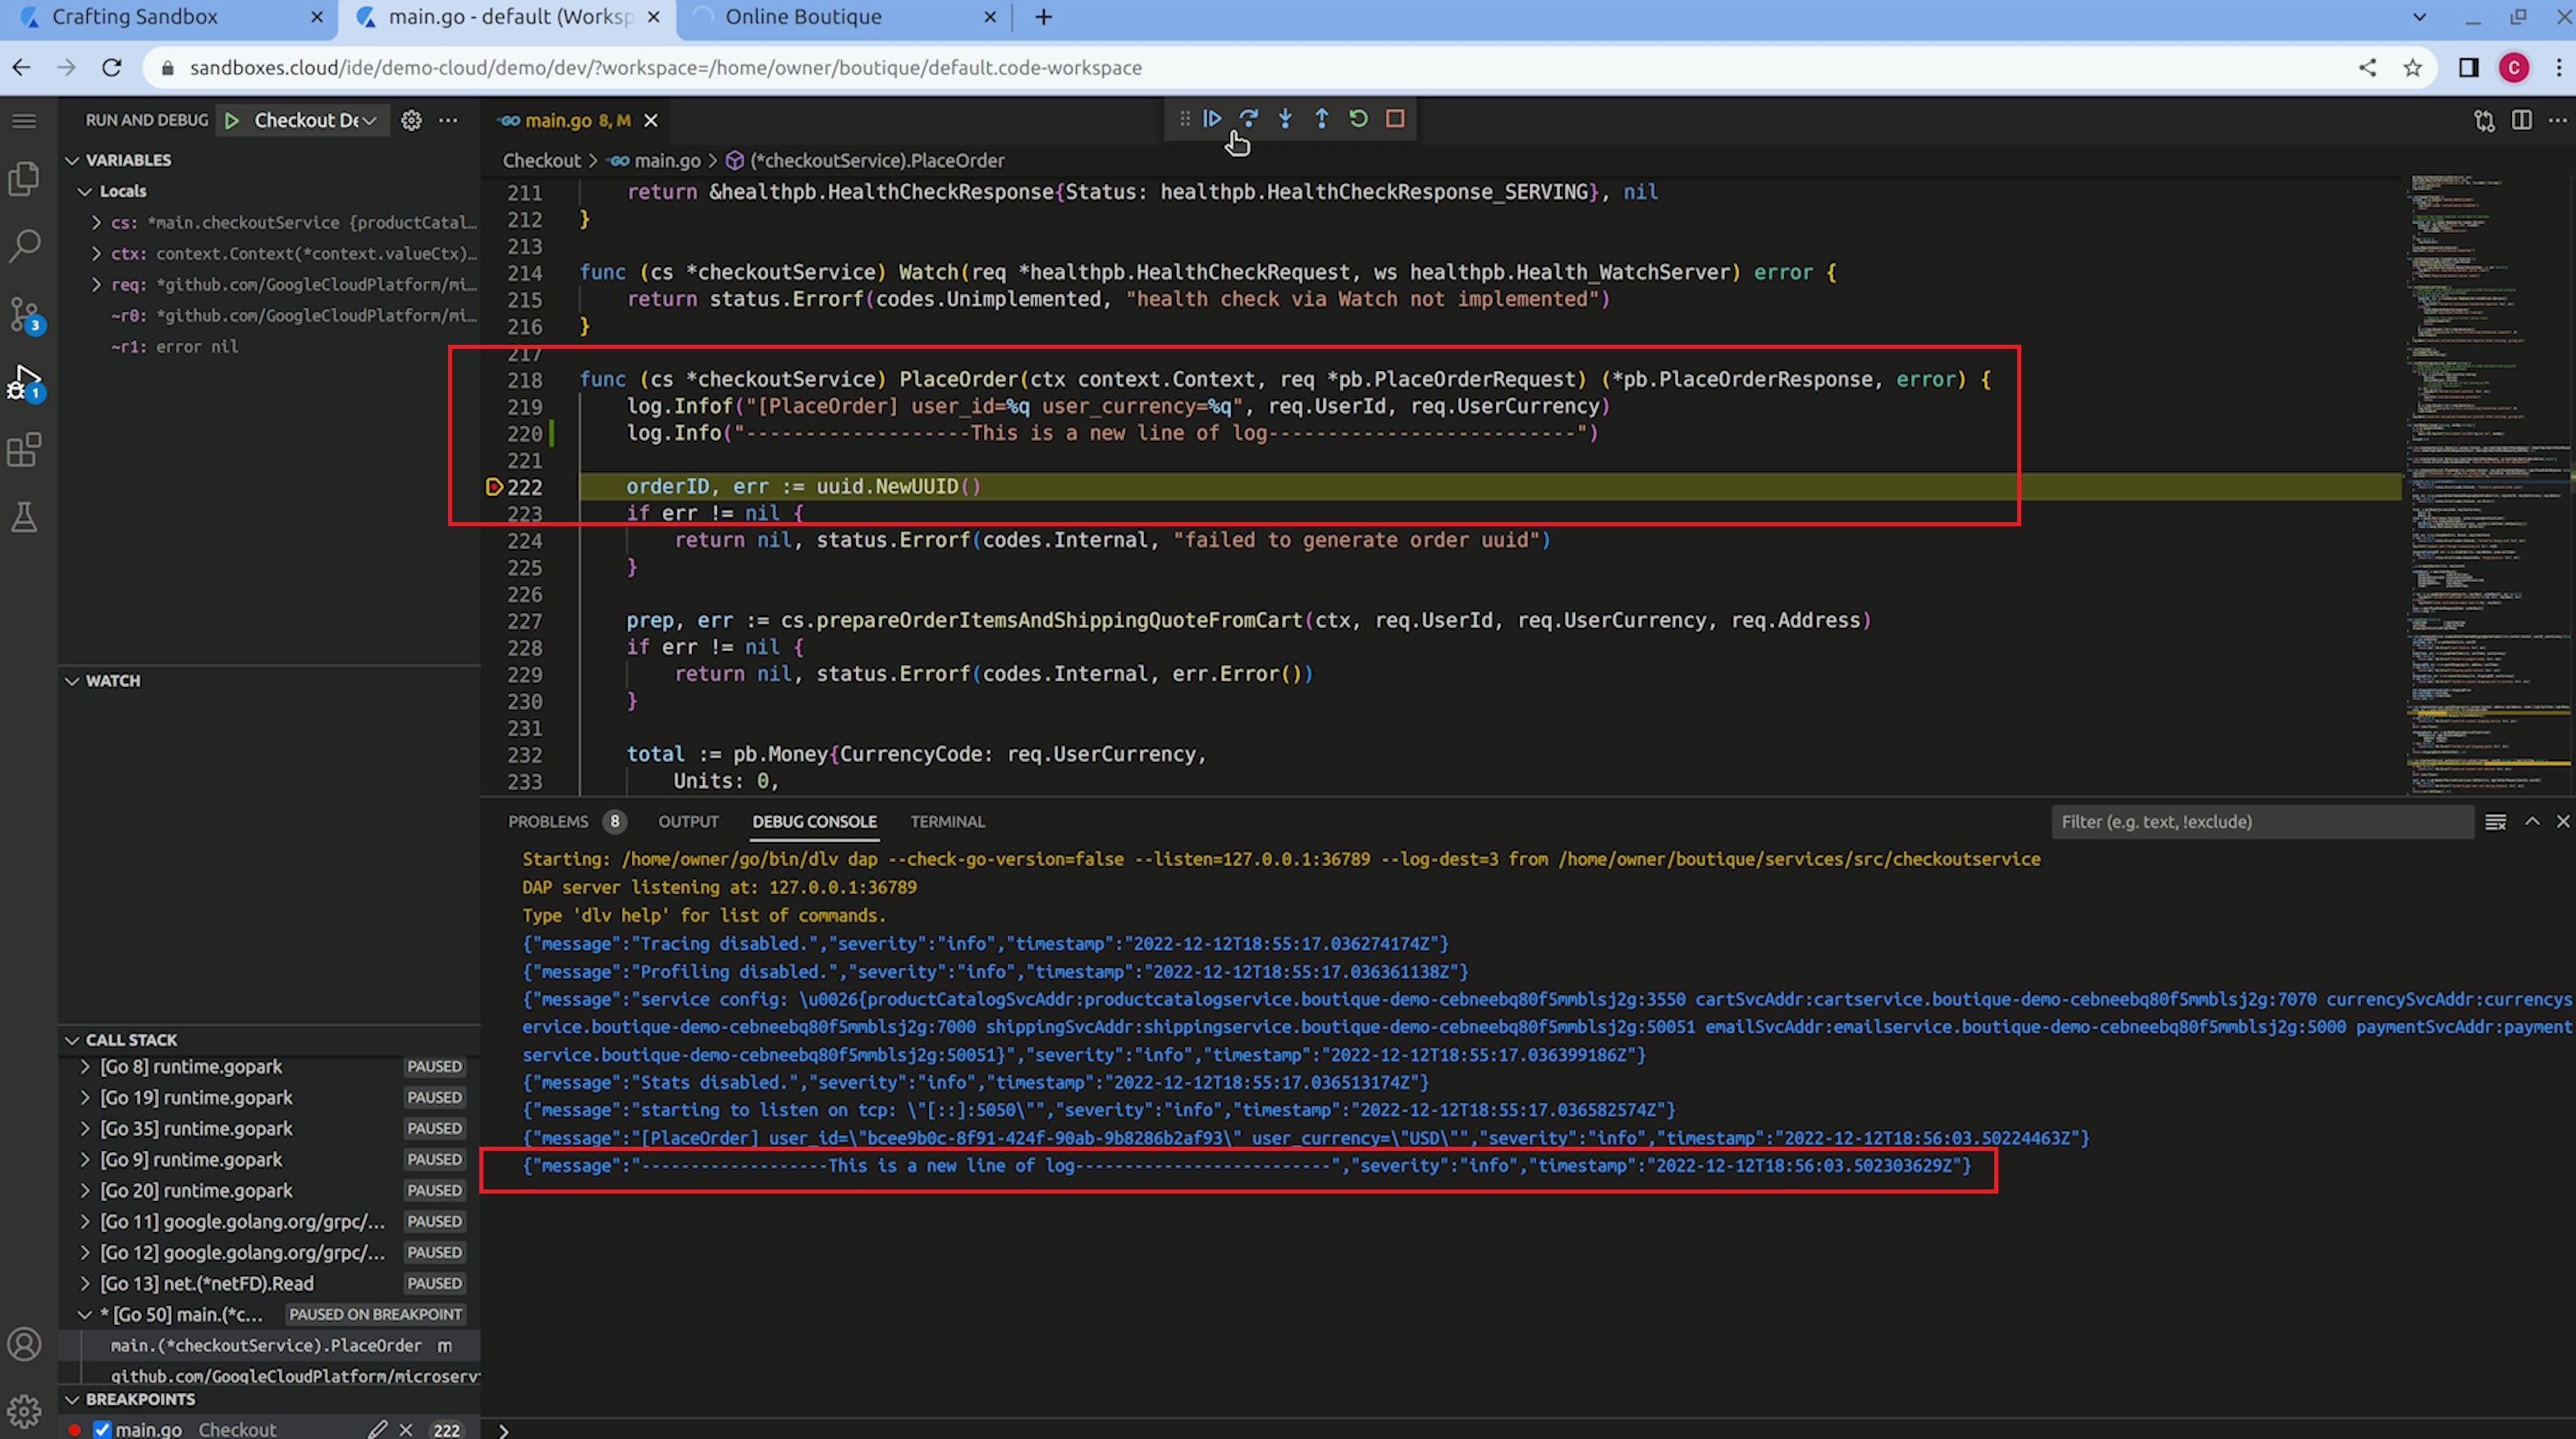
As we click the "Place Order" button, we can see that the breakpoint in our dev version of the checkout service is hit, indicating the traffic is intercepted from the checkout service in the Kubernetes namespace to our dev workspace in the sandbox. The log line we added is also effective and prints the log in there. When we click continue from the debugger, our dev version of checkout service will call other services like payment and email in the Kubernetes namespace to finish the flow.
With traffic interception, you can code your dev version of the service in context and instantly test it with other services running in Kubernetes. By avoiding the repeated "build, upload, test" process, and debugging in place, your iteration speed is greatly improved!
Manage lifecycle of Kubernetes namespaces with sandbox
A common issue for having on-demand per-developer Kubernetes namespace is how to manage their lifecycles. If not properly managed, there might be a lot of dangling namespaces running in the cluster, wasting resources.
Crafting helps manage the namespaces by combining their lifecycle with sandboxes. You can manage the lifecycle of the Kubernetes namespace by managing the sandbox itself. Specifically, when the sandbox is suspended, all the services in the namespace can be scaled to 0 replicas, saving the resources, and when it's resumed after suspension, everything is scaled back quickly. When the sandbox is deleted, the corresponding namespace is destroyed.
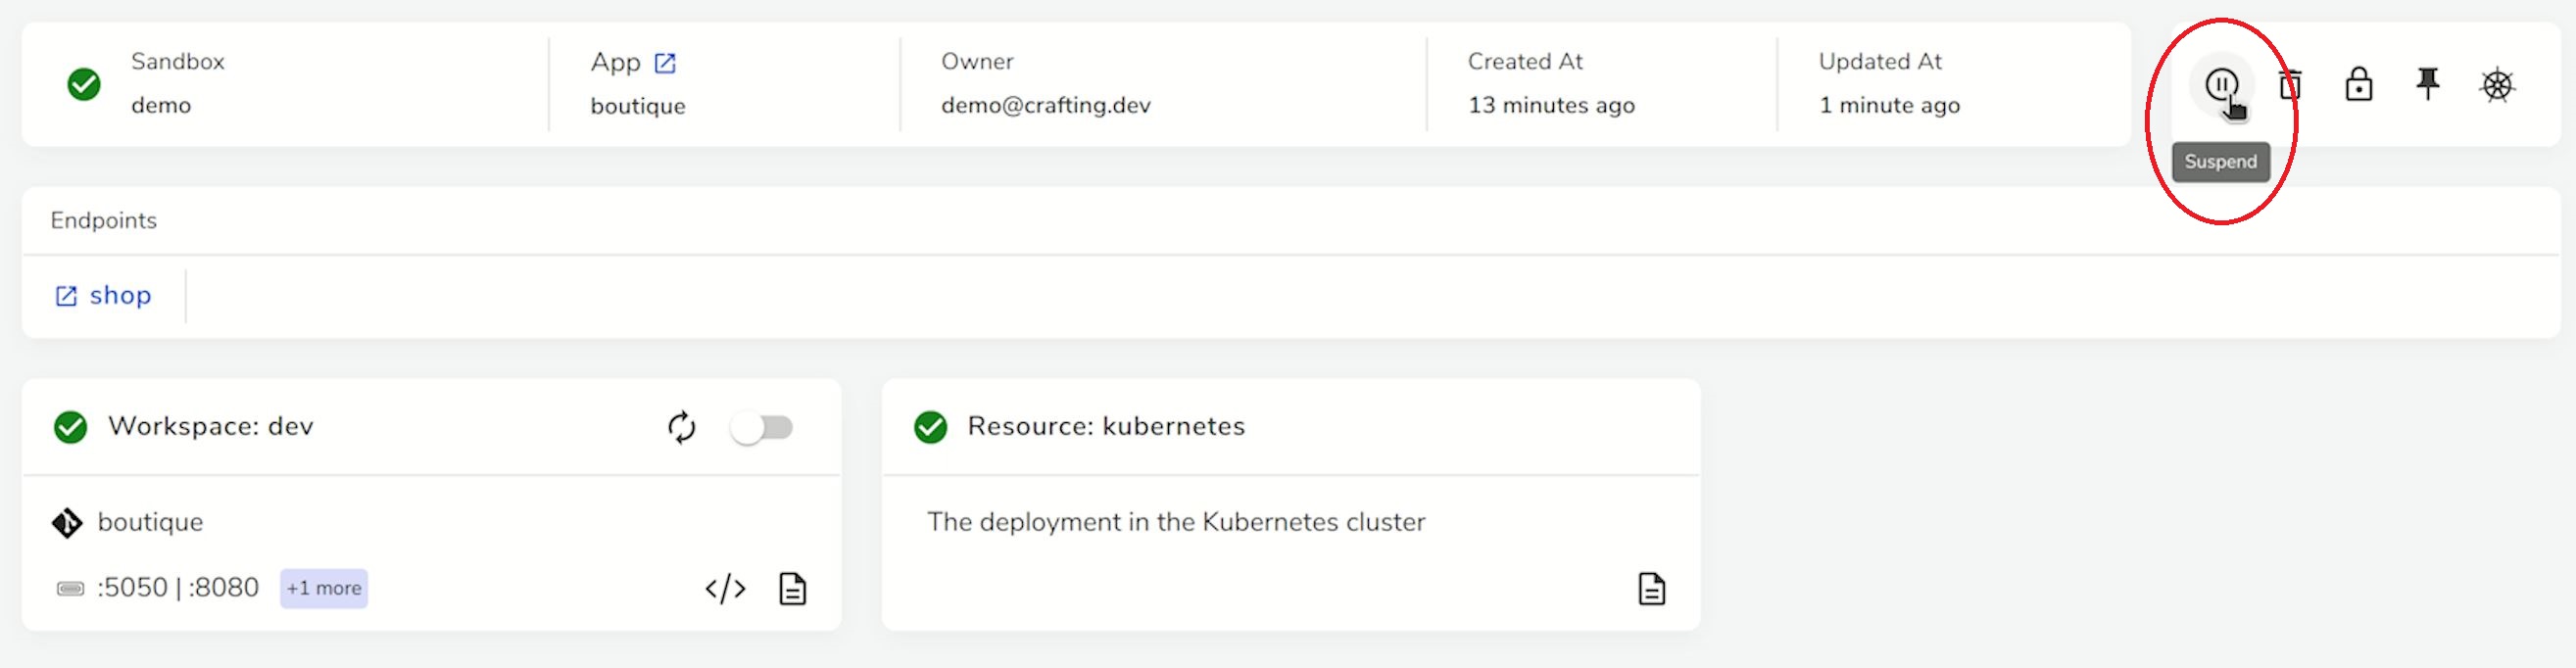
For example, from the sandbox page (shown above), if we suspend a sandbox with Kubernetes resource, it will scale down the services in the corresponding namespace as shown below.
With this coupling mechanism and Crafting Sandbox's auto-suspension (in the order of hours) and auto-cleanup (in the orders of days) capability, you can make sure that if the developer leaves the namespace idle and unused, it would stop consuming resource very soon and eventually cleaned up from the Kubernetes cluster.
Setup Checklist
To setup Crafting for Kubernetes, the following items are required:
- The Crafting system (SaaS or self-hosted) and your account on Crafting
Firstly, you need to have a working system of Crafting platform that you can access via your account. There are three options: Crafting Express, Crafting SaaS, and Crafting Enterprise
- Connect your Kubernetes cluster to Crafting
Secondly, you need to connect your Kubernetes cluster to Crafting. Assuming you already have your local kubectl setup to access your Kubernetes cluster, this can done by a simple command with cs infra connect kubernetes and give the cluster a name on Crafting.
With that command, Crafting will not modify any config of your Kubernetes cluster, instead it will install a Crafting agent there to do everything it needs. After this step, you can already do traffic interception to debug any existing Kubernetes workloads in the cluster with a sandbox. Please see Command Line Tool for details
- Setup
kubectlaccess from sandbox
If using kubectl to access the cluster is desired in day-to-day development in a workspaces on Crafting, you need to setup a kubeconfig file (or via KUBECONFIG environment variable). The Crafting Kubernetes agent provides a proxy allowing direct cluster access, or you can setup access via cloud provider. Please see Setup for Kubernetes for detailed instructions.
- Configure your sandbox with Kubernetes resource and lifecycle scripts
The last step is to step up the resource model in the sandbox. Here you can specify naming convention of the namespaces and specify what exactly happens what needs to happen when a sandbox is created/suspended/resumed/deleted. Please see here for details.
Updated 8 months ago