
Setup for Cloud Resources
Crafting can manage the lifecycle of resources outside the system, like services from the cloud providers (e.g. RDS, SQS on AWS, PubSub on GCP), as all-in-one, self-contained dev environments. The lifecycle management provides hooks to provision/unprovision resources during sandbox creation and deletion, and optionally scale in/up during sandbox suspension and resuming.
This section walks through the one-time setup and a few examples of using the sandbox lifecycle. For the user guide on how a developer to use this setup to develop with Cloud resources, please see Develop with cloud resources. Specifically, the outline of this page:
Access Setup
In most cases, access setup is needed to manage resources from the cloud provider. It's recommended using identity federation to setup the access without persisting sensitive information. Alternatively, you can also store credentials using Secrets (see Secrets for storing dev credentials)
How identity federation works
The Crafting system can be registered as an OIDC (OpenID Connect) provider in the Cloud IAM as an identity provider. After that, bind that with Roles on AWS or Service Accounts on GCP, so the identity from the Crafting system can access the cloud under the service account or role.
AWS guide
-
Add an Identity Provider to IAM: from IAM, add an Identity Provider of type
OpenID Connect, with the following information:- Provider URL:
https://sandboxes.cloud(or the site URL for self-hosted Crafting); - Audience: Your org name in the Crafting system;
- Provider URL:
-
Assign a role: add
AssumeRolepolicy (aka Trust relationships) like the following on the designated role. The<PROVIDER-NAME>is the host name in the provider URL, e.g.sandboxes.cloud; the<YOUR ORG NAME>must be lower cased.{ "Version": "2012-10-17", "Statement": [ { "Effect": "Allow", "Principal": { "Federated": "arn:aws:iam::<ACCOUNT-ID>:oidc-provider/<PROVIDER-NAME>" }, "Action": "sts:AssumeRoleWithWebIdentity", "Condition": { "StringEquals": { "<PROVIDER-NAME>:aud": [ "<YOUR ORG NAME>" ] } } } ] } -
In the sandbox, use the following content as
$AWS_CONFIG_FILE:[default] region = <YOUR REGION> credential_process = idfed aws <ACCOUNT-ID> <ROLE-NAME>It is recommended to save that as a secret and add environment variable in the Template:
$ cs secret create --shared aws-config -f config-fileAdd the following entry to the sandbox level
ENVor per-workspace:env: - AWS_CONFIG_FILE=/run/sandbox/fs/secrets/shared/aws-config
With above setup, all sandbox users can use AWS CLI from workspaces to directly access AWS account.
It's also possible to attach the above AssumeRole policy to more than one roles,
and use profiles in the $AWS_CONFIG_FILE to specify different roles for different processes:
[default]
region = <YOUR REGION>
credential_process = idfed aws <ACCOUNT-ID> <DEFAULT-ROLE-NAME>

[profile role1]
region = <YOUR REGION>
credential_process = idfed aws <ACCOUNT-ID> <ROLE1-NAME>

[profile role2]
region = <YOUR REGION>
credential_process = idfed aws <ACCOUNT-ID> <ROLE2-NAME>
Use AWS_PROFILE environment variable before launching a process so the process can run under the corresponding role.
To quickly validate the setup, run the following command:
aws sts get-caller-identityGCP guide
-
Add an Identity Provider to IAM: this can be done from IAM/Workload Identity Federation menu on the console. With Google Cloud SDK, using the following command:
gcloud iam workload-identity-pools create ${POOL_ID} --location=global gcloud iam workload-identity-pools providers create-oidc ${PROVIDER_ID} \ --issuer-uri="https://sandboxes.cloud" --allowed-audiences=${SANDBOX_ORG} \ --attribute-mapping="google.subject=assertion.sub" \ --workload-identity-pool=${POOL_ID} --location=global -
Bind to a service account (can be multiple service accounts):
gcloud iam service-accounts add-iam-policy-binding --role roles/iam.workloadIdentityUser \ --member "principalSet://iam.googleapis.com/projects/${PROJECT_NUMBER}/locations/global/workloadIdentityPools/${POOL_ID}/*" \ ${SERVICE_ACCOUNT_NAME}@${PROJECT_ID}.iam.gserviceaccount.com -
In the sandbox, use the following content for the file pointed by
$GOOGLE_APPLICATION_CREDENTIALS{ "type": "external_account", "audience": "//iam.googleapis.com/projects/<PROJECT-NUMBER>/locations/global/workloadIdentityPools/<POOL_ID>/providers/<PROVIDER_ID>", "subject_token_type": "urn:ietf:params:oauth:token-type:jwt", "token_url": "https://sts.googleapis.com/v1/token", "service_account_impersonation_url": "https://iamcredentials.googleapis.com/v1/projects/-/serviceAccounts/<SERVICE_ACCOUNT_NAME>@<PROJECT_ID>.iam.gserviceaccount.com:generateAccessToken", "credential_source": { "file": "/run/sandbox/fs/metadata/1000/token", "format": { "type": "text" } } }Specifically, for accessing a GKE cluster, use the following as the user credential in the
kubeconfigfile:apiVersion: v1 kind: Config ... users: - name: foo user: exec: apiVersion: client.authentication.k8s.io/v1beta1 command: idfed args: - gke
With above setup, the processes in the sandbox should be able to access the GCP project (and GKE clusters), except some old client libraries which don't support GCP Workload Identity Federation.
It's recommended to save the above config files as secrets, and add environment variables to the App or per-workspace (assume the secrets are gcp-account.json and kubeconfig:
env:
- GOOGLE_APPLICATION_CREDENTIALS=/run/sandbox/fs/secrets/shared/gcp-account.json
- CLOUDSDK_AUTH_CREDENTIAL_FILE_OVERRIDE=$GOOGLE_APPLICATION_CREDENTIALS
- KUBECONFIG=/run/sandbox/fs/secrets/shared/kubeconfig
To quickly validate the setup, run:
gcloud auth print-access-tokenIt's not necessary to use gcloud login as it will save a user login credential into home directory.
Setup Per-Sandbox Cloud Native Resources
Prepare provision scripts
After Access Setup, a developer is able to access the API of cloud provider and use CLI tools to manually create resources. A sandbox workspace is a good place to develop the resource provisioning scripts. The sandbox lifecycle hooks use general shell commands to manage resources, so any tools can be used for this purpose. Terraform is a very popular tool for this purpose and it's highly recommended. Crafting providers a simplified configuration for hooking up Terraform into the sandbox lifecycle with additional features like visualizing the state.
Define resources in sandbox
Once the scripts are ready, define the resources in a sandbox template, like:
workspaces:
- name: dev
  checkouts:
  - path: src
    ...
resources:
- name: aws
  brief: Dev Resources on AWS
  handlers:
    on_create:
      use_workspace: dev
        name: dev
        run:
          dir: src
          cmd: ./scripts/provision.sh
    on_delete:
      use_workspace: dev
        name: dev
        run:
          dir: src
          cmd: ./scripts/unprovision.sh
The resources list defines one or more groups of resources to be managed in the sandbox lifecycle, and they are provisioned/unprovisioned independently. For the full reference, please read Sandbox Definition.
The handlers specifies the scripts to run in specific lifecycle events, like sandbox creation (on_create), sandbox deletion (on_delete). Each handler will run the script using a workspace, so the scripts can be managed in source control, automatically checked out in a workspace during sandbox creation and leverage all tools from the workspace snapshot. The run.dirspecifies a path related to the home directory in the workspace as the working directory, and run.cmd specifies the actual command to run. This can be a single command or multi-line shell script.
When using Terraform, the configuration can be simpler:
workspaces:
- name: dev
  checkouts:
  - path: src
  ...
resources:
- name: aws
  brief: Dev Resources on AWS
  terraform:
    workspace: dev
    dir: deploy/tf
    run:
      timeout: 600s
      vars:
        instance_type: 't2.micro'
The configuration specifies the location of the main Terraform module in the workspace and the sandbox knows how to do with it:
- During sandbox creation, it will run
terraform initandterraform apply; - During sandbox deletion, it will run
terraform destroy.
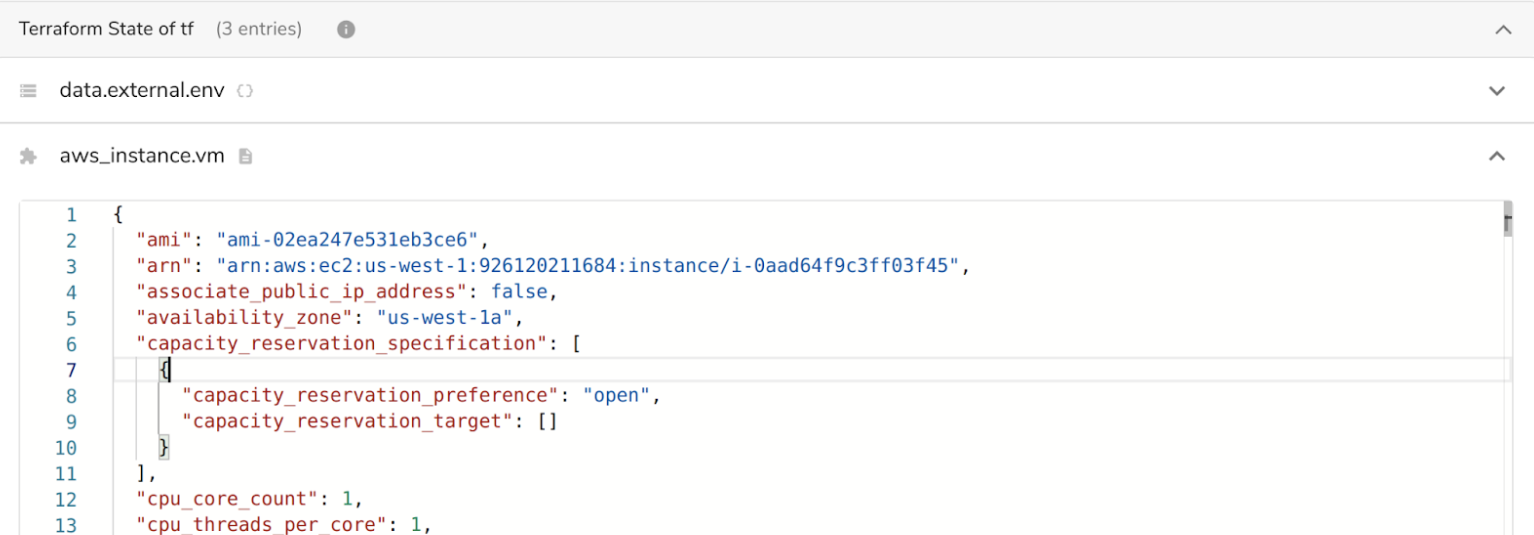
As the lifetime of the resources is aligned with the sandbox, the terraform state should be saved in the same folder in the workspace, and the Crafting system will be able to visualize the state from that file.
Share the template
Save the above configuration as a Template and test with a new sandbox. Once everything looks good, the Template can be shared with other developers. With a single click, a sandbox brings up a full, self-contained dev environment.
Advanced Topics
Details about the resources
A resource is displayed as a Card similarly to other workloads, like workspaces, dependencies, containers etc. When clicking on the Card, it opens up a detailed view. The author of the Template is able to provide customized details in the view to help developers know better about what have been provisioned, even with convenient links to open external URLs to access/manage the resources.
To do that, specify save_state: true in the handlers and add a details property with a markdown template:
workspaces:
- name: dev
  checkouts:
  - path: src
    ...
resources:
- name: aws
  brief: Dev Resources on AWS
  details: |
    ## Provisioned Resources
    - [RDS]({{state.rdsUrl}})
  handlers:
    on_create:
      save_state: true
      use_workspace:
        name: dev
        run:
          dir: src
          cmd: ./scripts/provision.sh
    on_delete:
      use_workspace:
        name: dev
        run:
          dir: src
          cmd: ./scripts/unprovision.sh
With save_state: true, the STDOUT of the script is expected to be JSON and used as the context (referenced as state) to render the markdown template in the details field. For example, the output of ./scripts/provision.sh is like:
{"rdsUrl":"https://rds.awsamazon.com/someid"}The above template will be rendered as (substituting {{state.rdsUrl}}:
## Provisioned Resources
- [RDS](https://rds.awsamazon.com/someid)
It's important to make sure non-JSON outputs are written to STDERR rather than STDOUT.
When using Terraform, Crafting will retrieve the output (terraform output) in JSON and use that as context, for example:
workspaces:
- name: dev
  checkouts:
  - path: src
  ...
resources:
- name: aws
  brief: Dev Resources on AWS
  details: |
    EC2 Instance: {{state.instance_id}}
  terraform:
    save_state: true
    workspace: dev
    dir: deploy/tf
    run:
      timeout: 600s
      vars:
        instance_type: 't2.micro'
In addition to the details, Crafting will also show the state of each Terraform resource.
The saved state can also be referenced in the sandbox summary template, prefixed by resource name. For example:
summary: |
  This sandbox contains an EC2 instance:
  - {{resources.aws.state.instance_id}}
workspaces:
- name: dev
  checkouts:
  - path: src
  ...
resources:
- name: aws
  brief: Dev Resources on AWS
  details: |
    EC2 Instance: {{state.instance_id}}
  terraform:
    save_state: true
    workspace: dev
    dir: deploy/tf
    run:
      timeout: 600s
      vars:
        instance_type: 't2.micro'
Suspend and resume
The resource handlers can optionally take advantage of sandbox suspend and resume events to further optimize the cost of cloud resources, by defining on_suspend and on_resume:
workspaces:
- name: dev
  checkouts:
  - path: src
    ...
resources:
- name: aws
  brief: Dev Resources on AWS
  handlers:
    on_create:
      use_workspace:
        name: dev
        run:
          dir: src
          cmd: ./scripts/provision.sh
    on_delete:
      use_workspace:
        name: dev
        run:
          dir: src
          cmd: ./scripts/unprovision.sh
    on_suspend:
      use_workspace:
        name: dev
        run:
          dir: src
          cmd: ./scripts/suspend.sh
    on_resume:
      use_workspace:
        name: dev
        run:
          dir: src
          cmd: ./scripts/resume.sh
If the cloud resources are stateless, the same scripts of on_create and on_delete can be used for on_suspend and on_resume. Please note, if save_state: true is specified in on_resume, it will overwrite the state generated by on_create.
Here's the example of Terraform:
workspaces:
- name: dev
  checkouts:
  - path: src
  ...
resources:
- name: aws
  brief: Dev Resources on AWS
  terraform:
    save_state: true
    workspace: dev
    dir: deploy/tf
    run:
      timeout: 600s
      vars:
        instance_type: 't2.micro'
    on_suspend:
      vars:
        instance_count: '0'
If on_suspend is specified, terraform apply will be used with additional configuration (for example the instance_count variable above) during sandbox suspension. on_resume is implicitly enabled by using terraform apply during sandbox resuming.
Restrict Access to Workspaces and Secrets
In some cases, cloud resources are provisioned according to the sandbox lifecycle, while for development work, the developers are not granted permissions for creating/updating/removing cloud resources. Basically, the write permission is only used during the lifecycle events, and developers should have read only permissions when accessing the cloud resources. To achieve this, different configurations can be used. For example, use different secrets for different cloud roles/service accounts so they have different permissions. To prevent unintentional use of the wrong identity, the access to the secret for privileged cloud identity can be restricted as Admin Only.
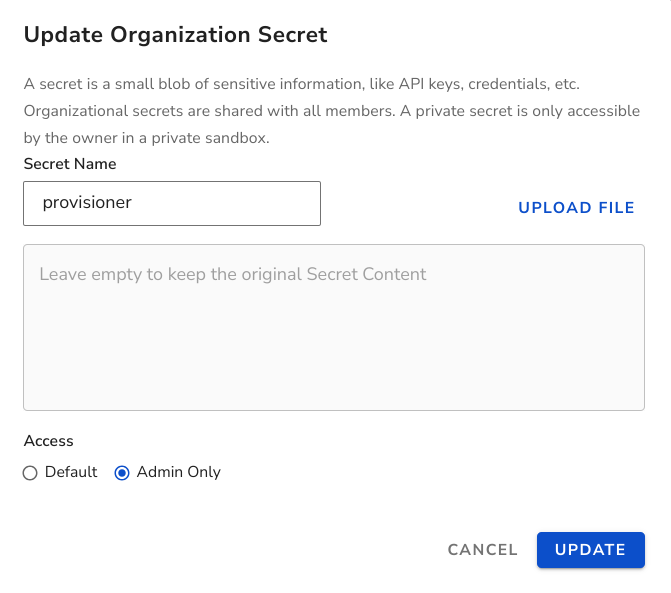
Those secrets are no longer mounted in regular workspaces, and they can't be referenced in environment variables either. They are only mounted when the workspace is in the Restricted mode:
When a workspace is in the Restricted mode, only org admin is allowed to access (including SSH, Web Terminal, WebIDE, Remote Desktop etc.) the workspace. Even the owner of the sandbox will be denied to access if the owner is not an org admin. In this mode, the secrets with access restriction set to Admin Only will be mounted in the folder for shared secrets.
The Restricted mode can only be enabled when a workspace is being created, and it can have one of the 2 life time settings:
- Start up: the workspace is created in Restricted mode, and it can exit the Restricted mode at any time requested by any user who has the Update permission to the sandbox. Once the workspace exits the Restricted mode, the secrets with access restriction set to Admin Only will be unmounted. And the workspace can no longer get back into Restricted mode again;
- Always: the workspace is created in Restricted mode and it will never exit the Restricted mode.
The Restricted mode is defined in the Sandbox Definition:
workspaces:
- name: example
  ...
  restriction:
    life_time: STARTUP # or ALWAYS if exit is not allowed
After the workspace is created, the Restricted mode is permanent. The workspace will not accept new settings from Sandbox Definition changes.
Here are 2 common practice using the workspace Restricted mode:
- Start the workspace in Restricted mode with
life_time = STARTUP. So the setup script is able to access secrets with access restriction set to Admin Only. As these secrets represent privileged cloud identity, the setup script is able to update/change cloud resources. Once done, the script will runcs sandbox restriction disable $SANDBOX_WORKLOADto exit the Restricted mode, so the developer is able to access the workspace; - Define a dedicated workspace always in Restricted mode (
life_time = ALWAYS). Usually this workspace is dedicated to run the lifecycle event handlers of resources, as it has access to the secrets with access restriction set to Admin Only. And it's not necessary for the developers to use this workspace.
Not for security purposeThis feature is designed for convenience and avoid unintentional mistakes. It's not designed for protecting access to sensitive information in secrets as part of security requirements.
Updated 6 months ago